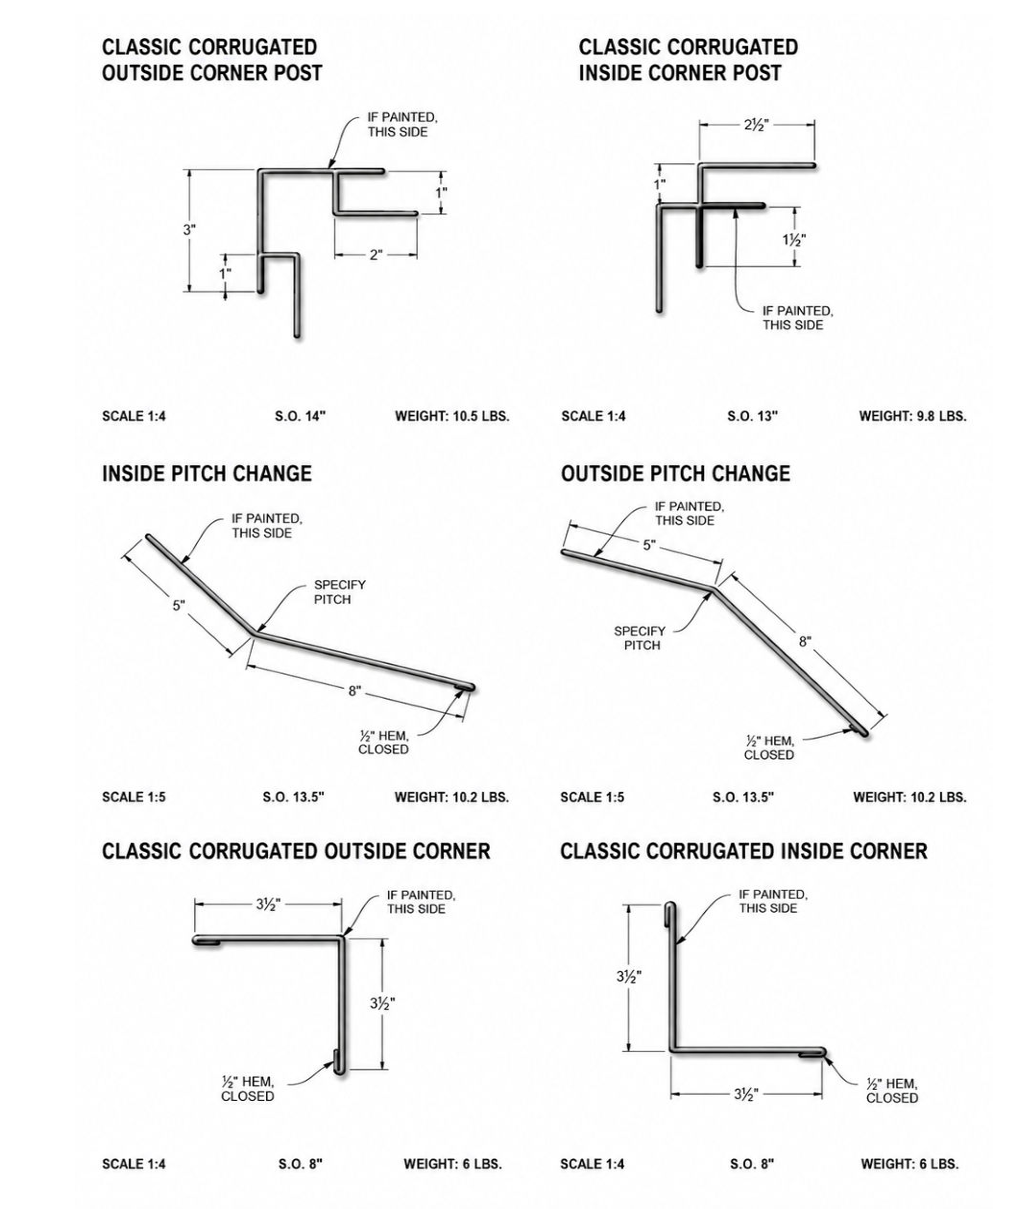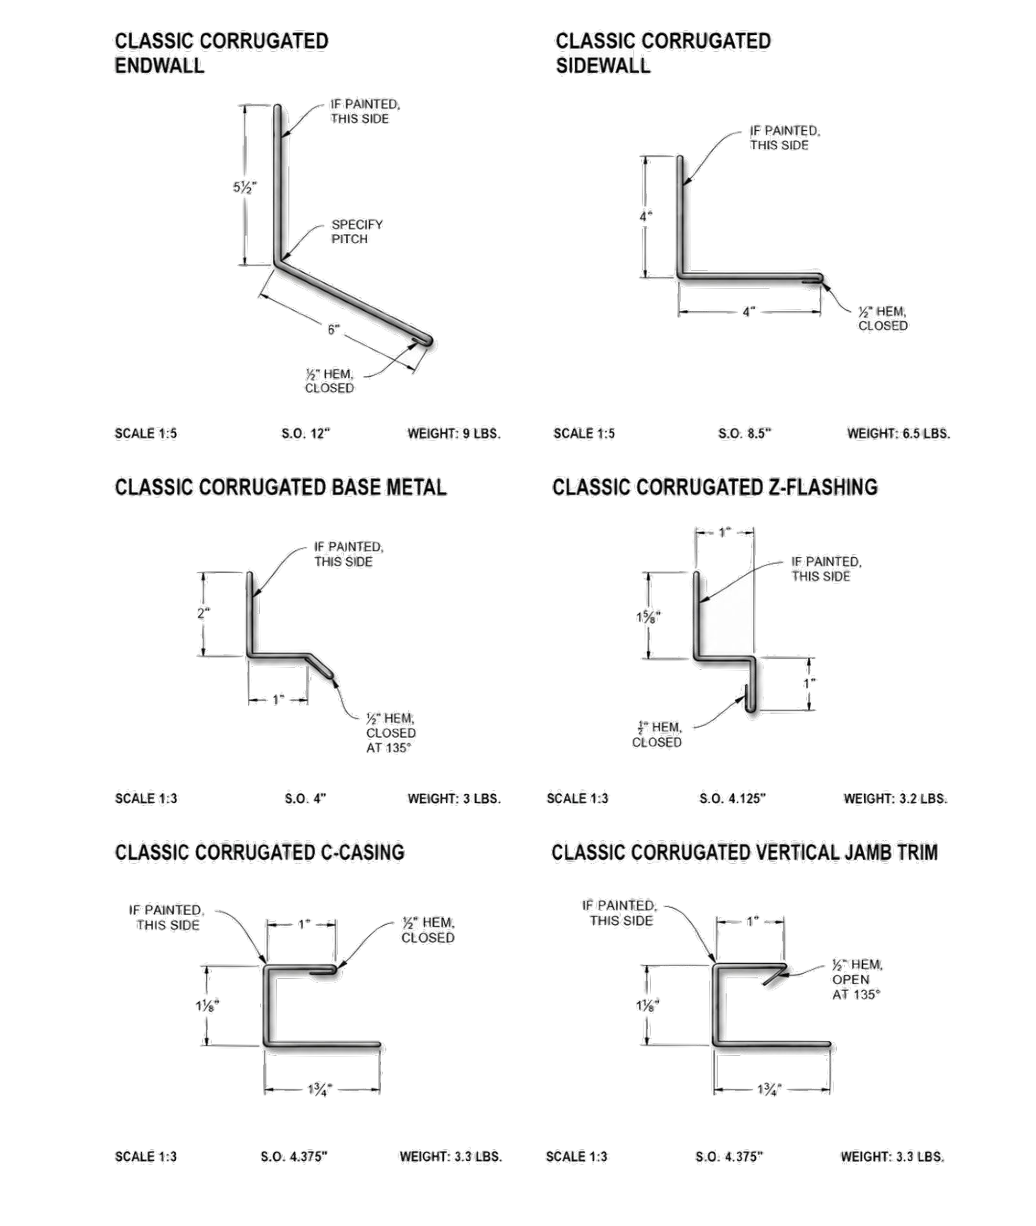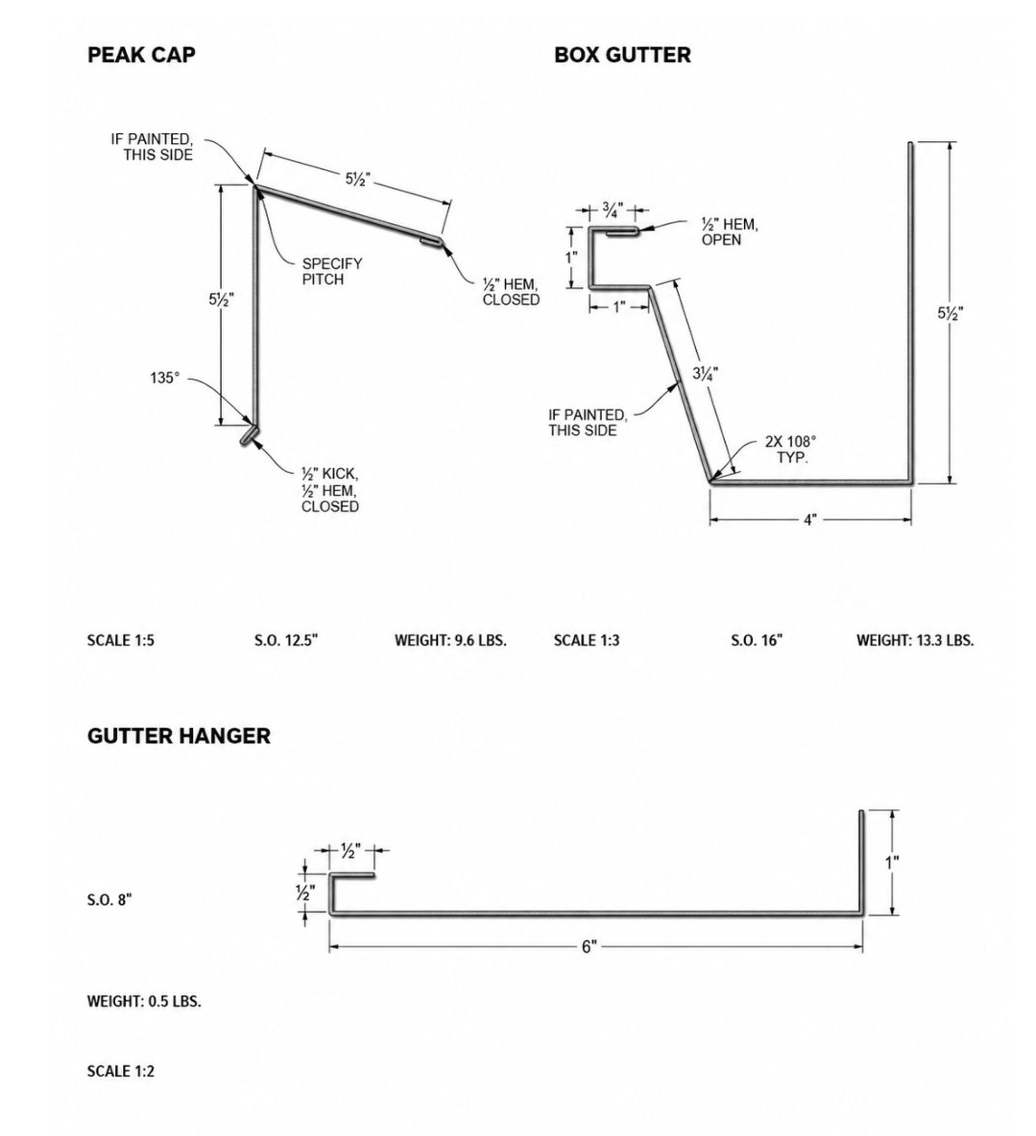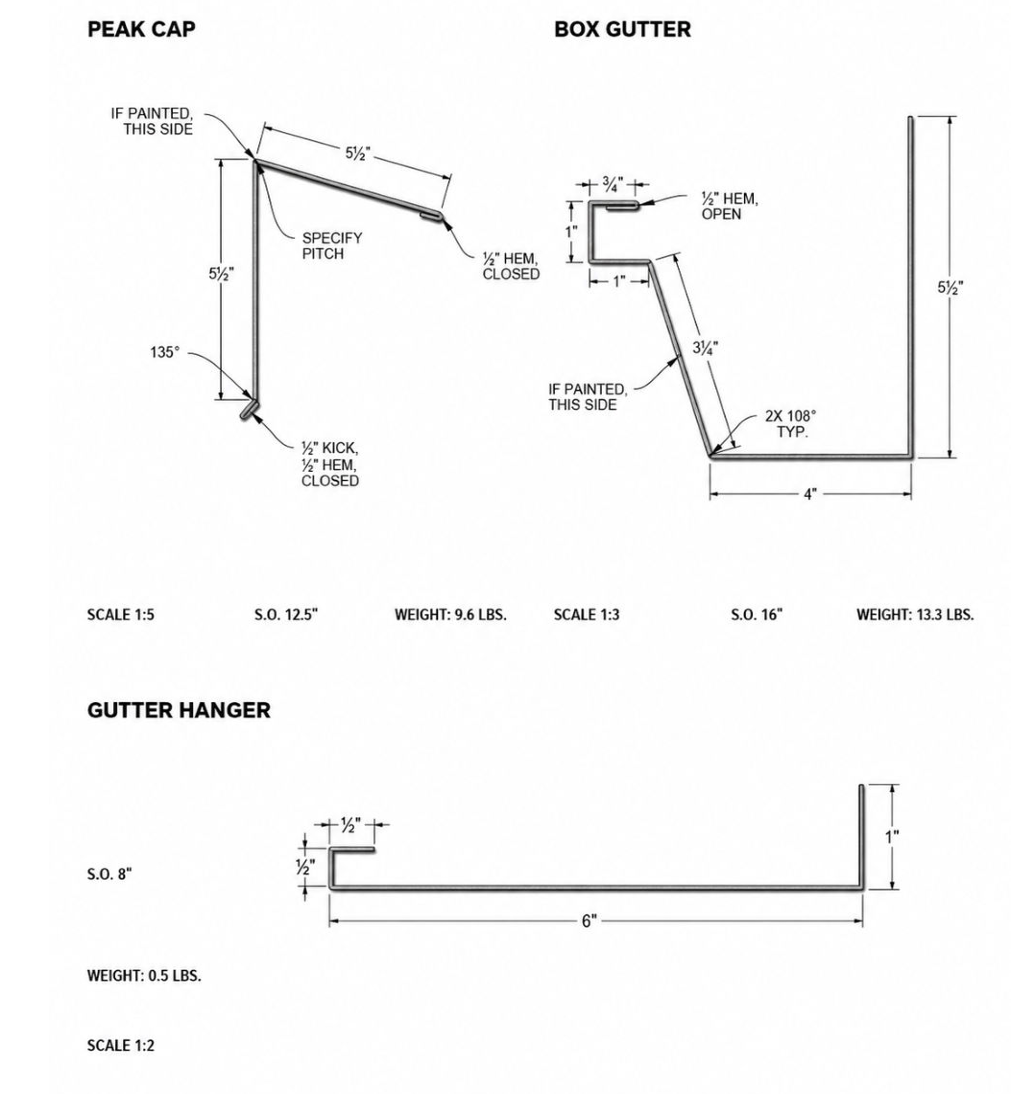
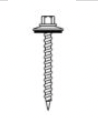
Corrugated 7/8" Metal Panel Installation Guide
S3 Metals 7/8" corrugated panels provide a durable exposed-fastener roofing and wall system with a classic corrugated profile built for strength, drainage, and versatile application. Designed for residential, commercial, agricultural, and architectural projects, the system is supported by matching flashings, fasteners, closures, sealants, and accessories.
Introduction
S3 Metals™ is a locally operated metal roofing and panel supplier serving contractors, builders, property owners, and commercial and residential projects throughout Northern California. We provide 7/8" corrugated metal roofing and wall panels along with matching flashings, fasteners, closures, sealants, accessories, and custom-fabricated trim, with a focus on responsive service, clear ordering, and fast turnaround.
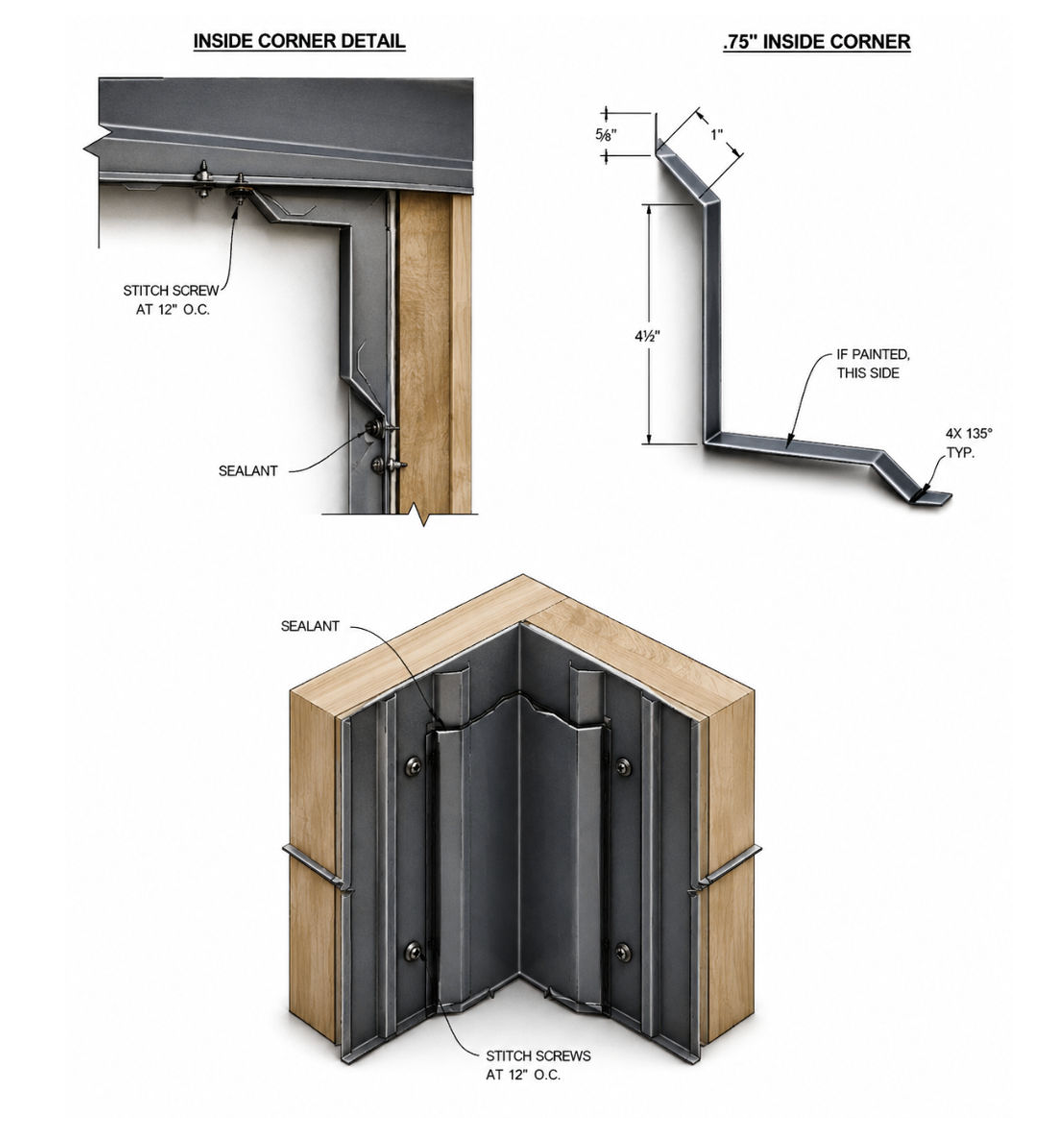
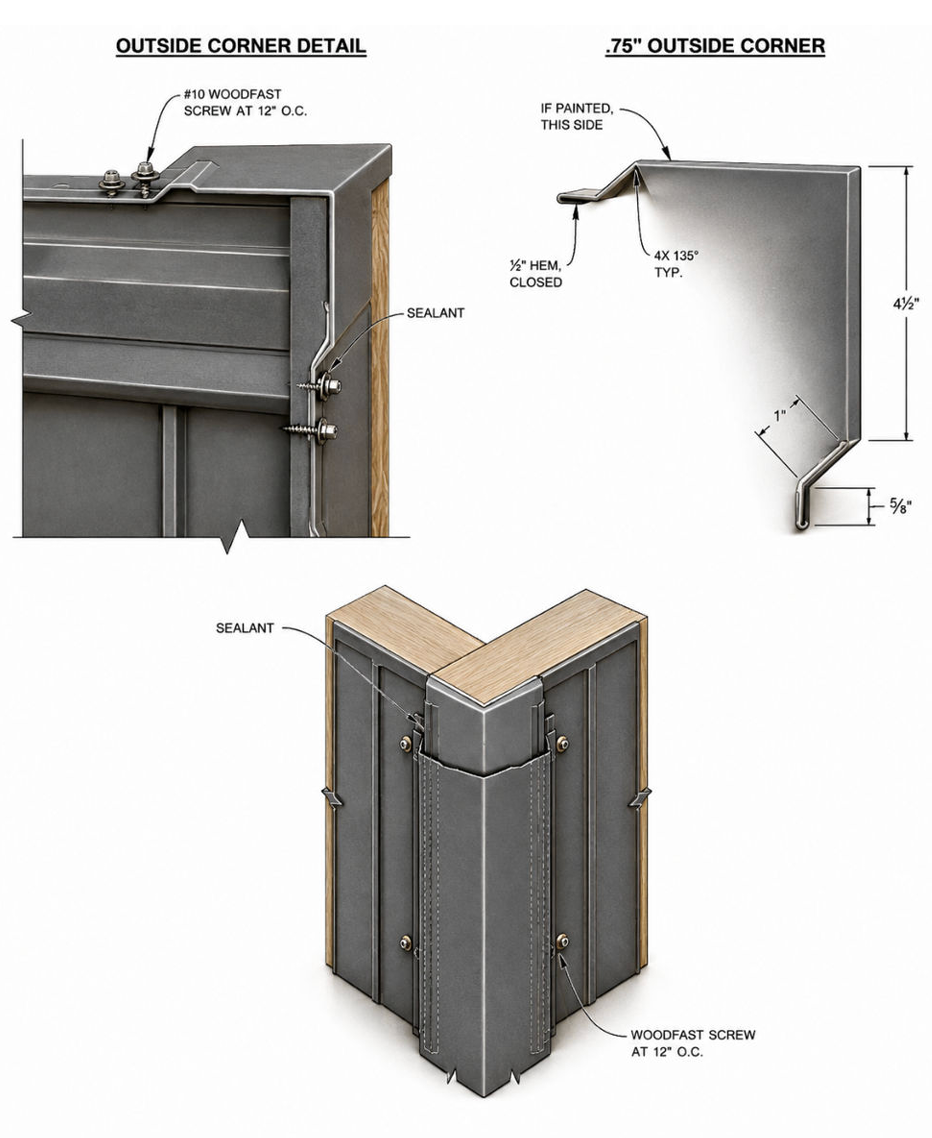
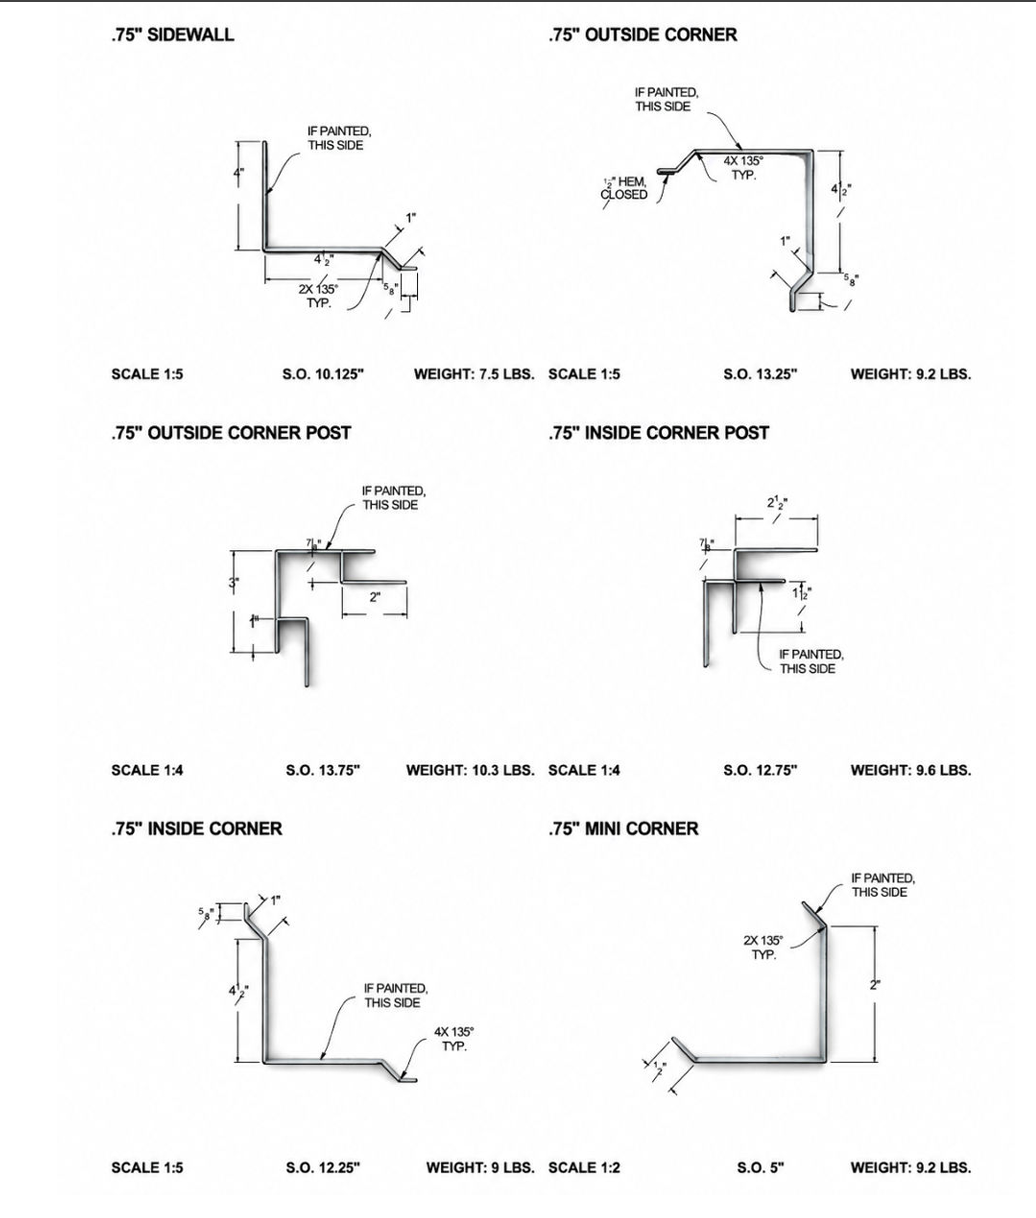
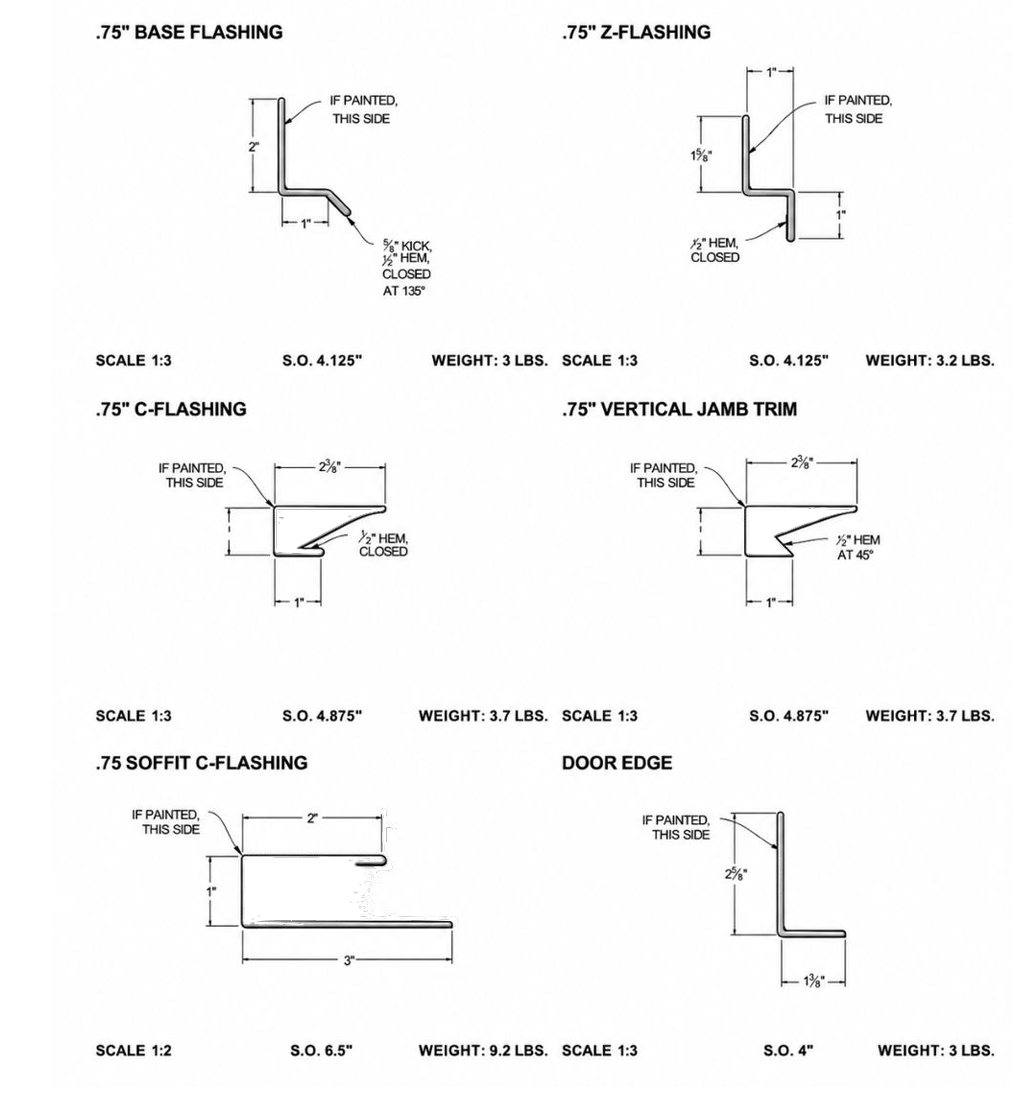
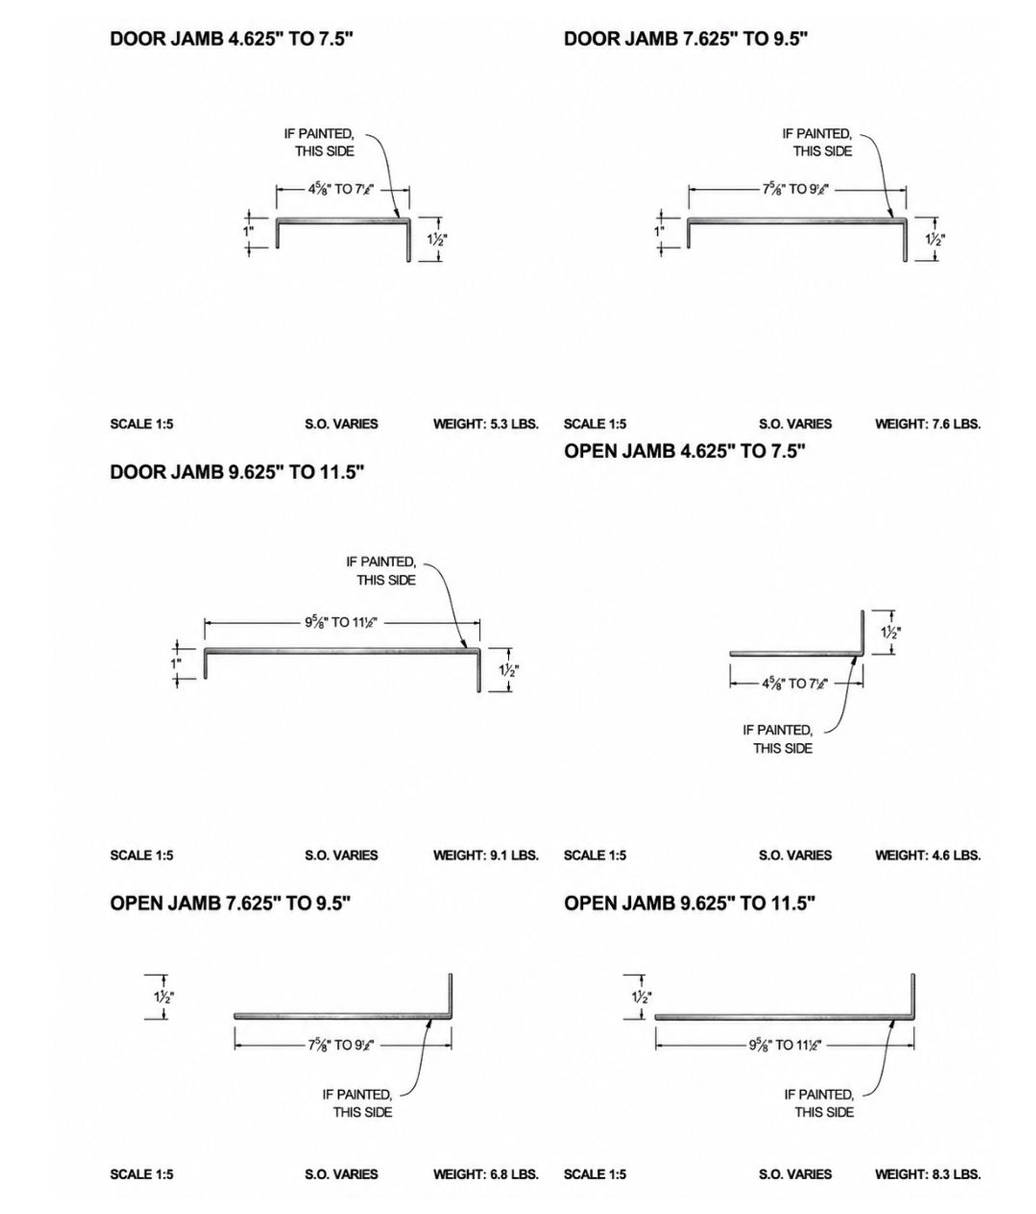
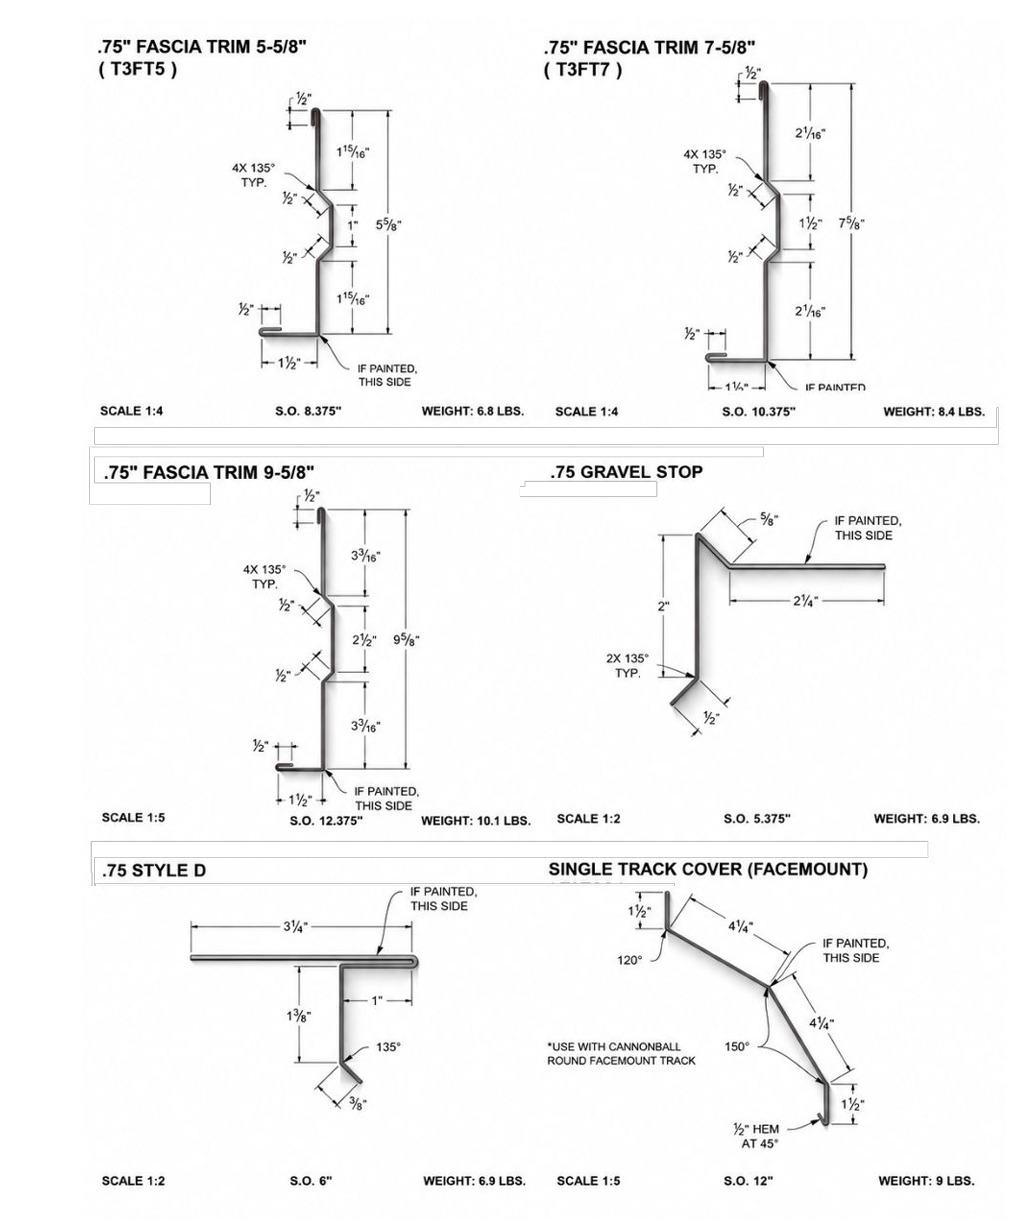
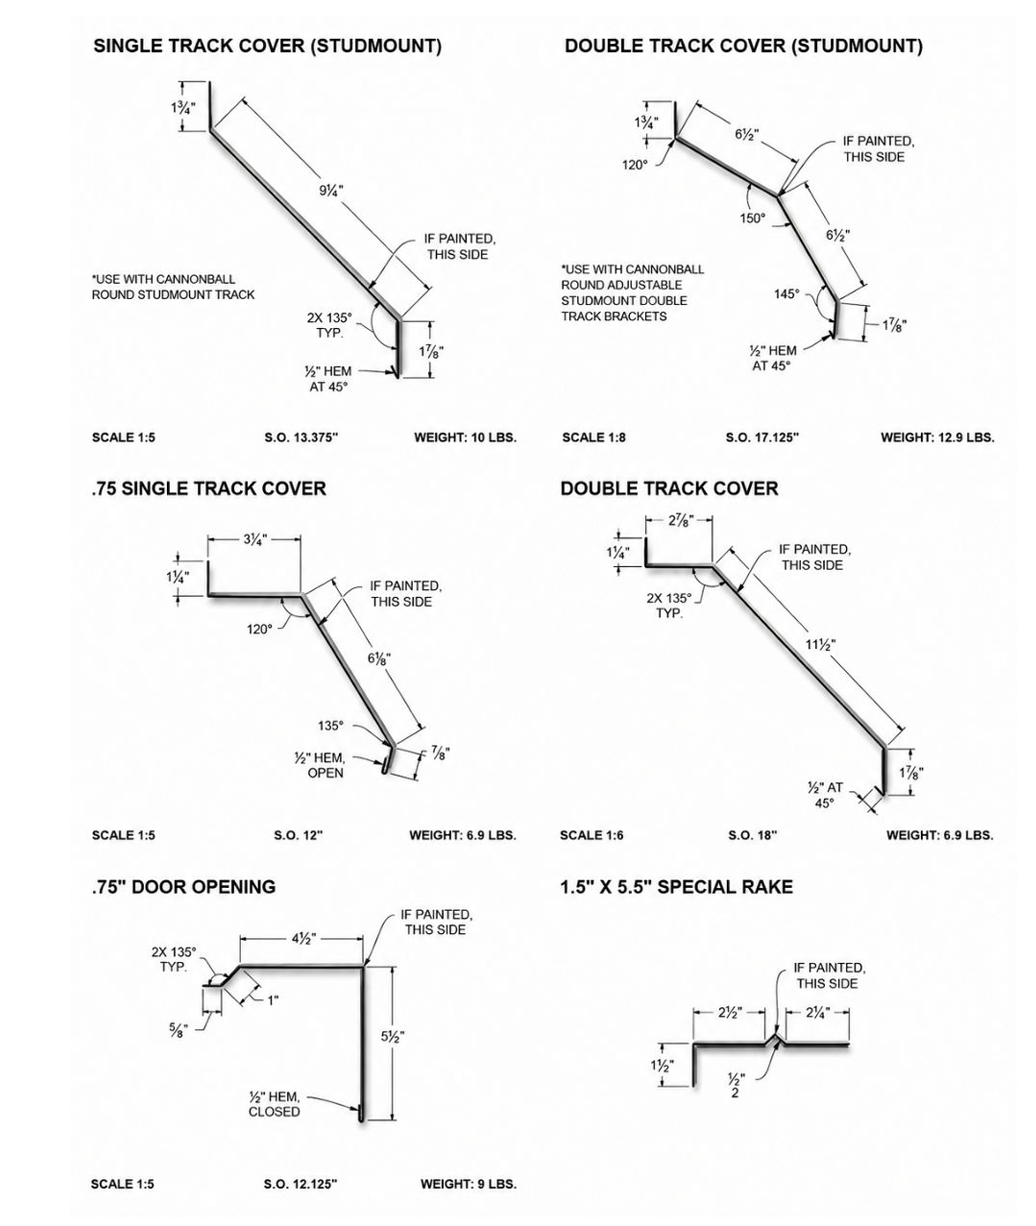
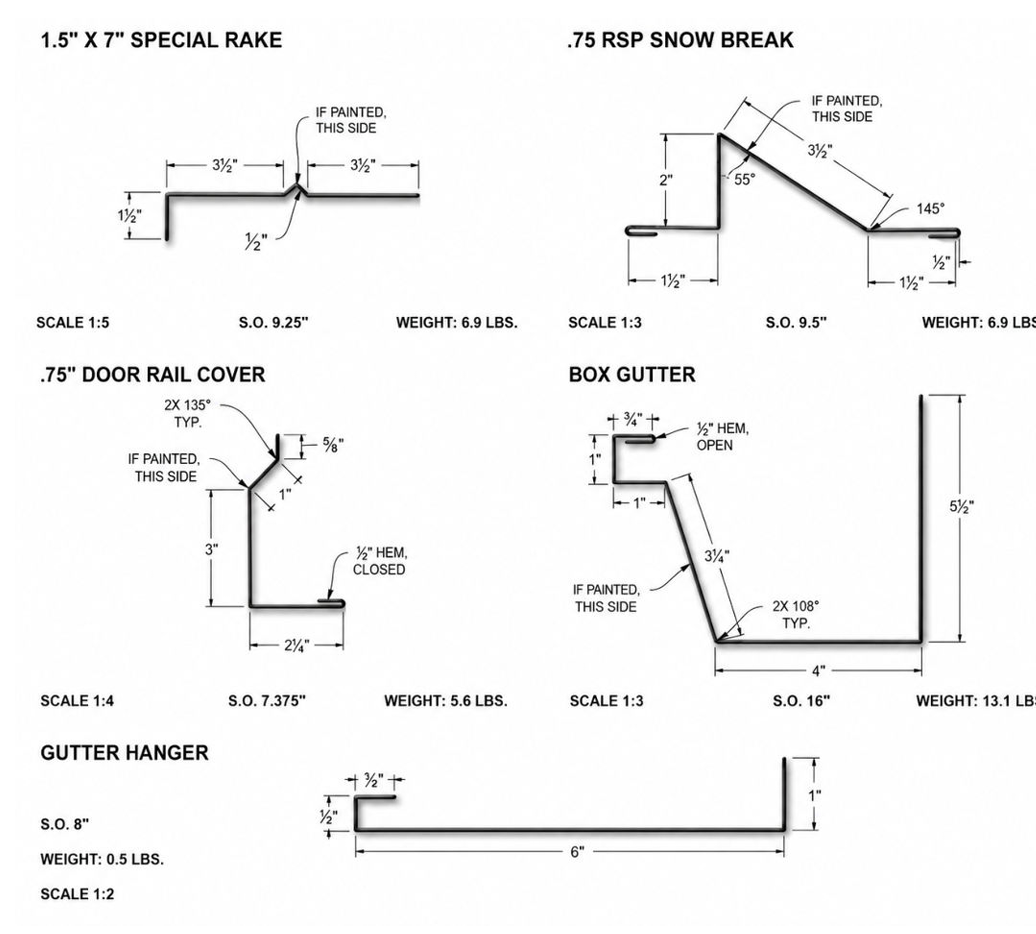
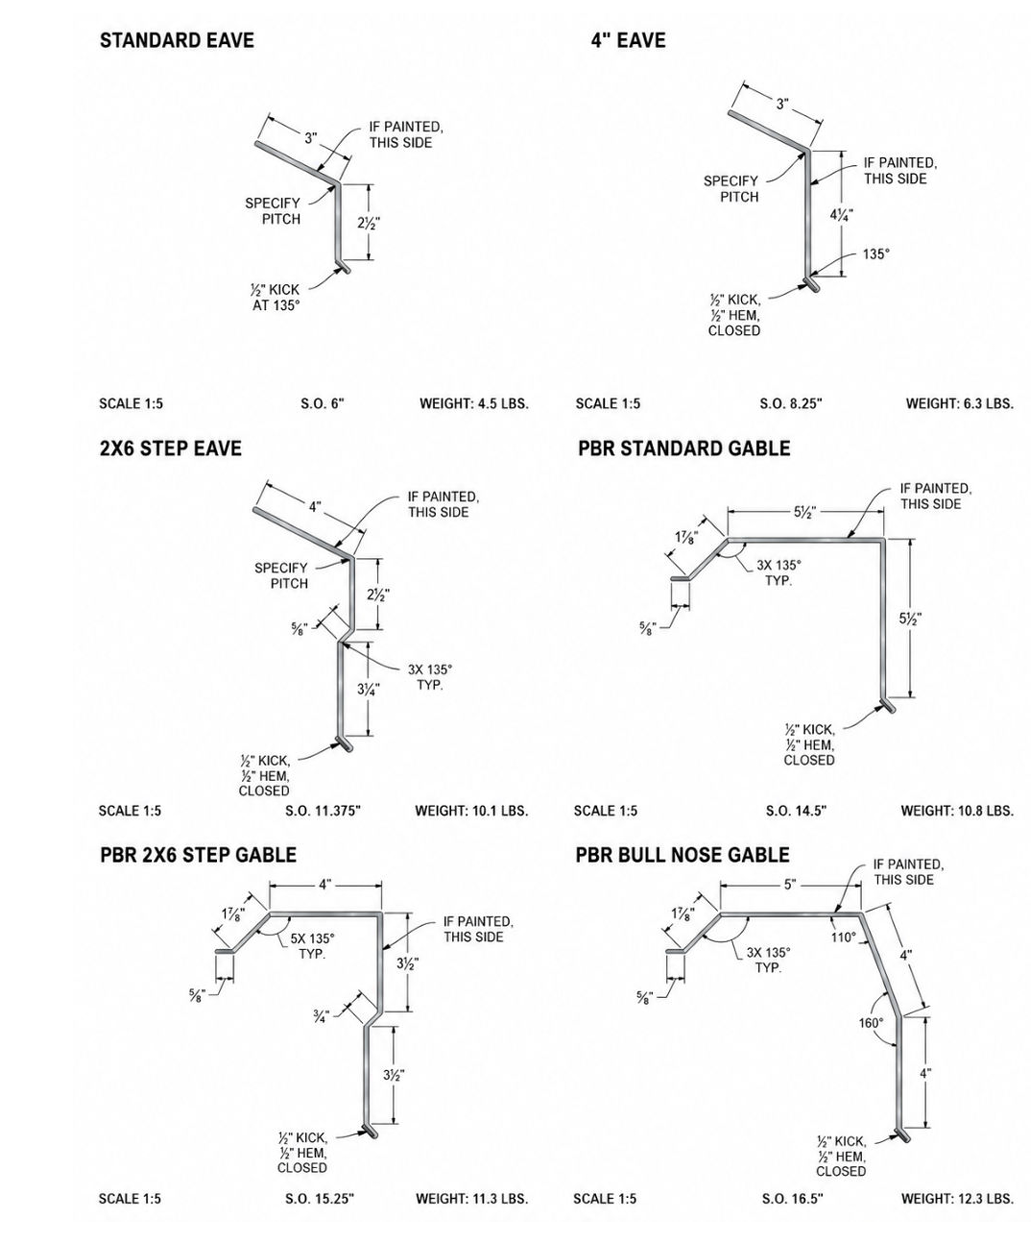
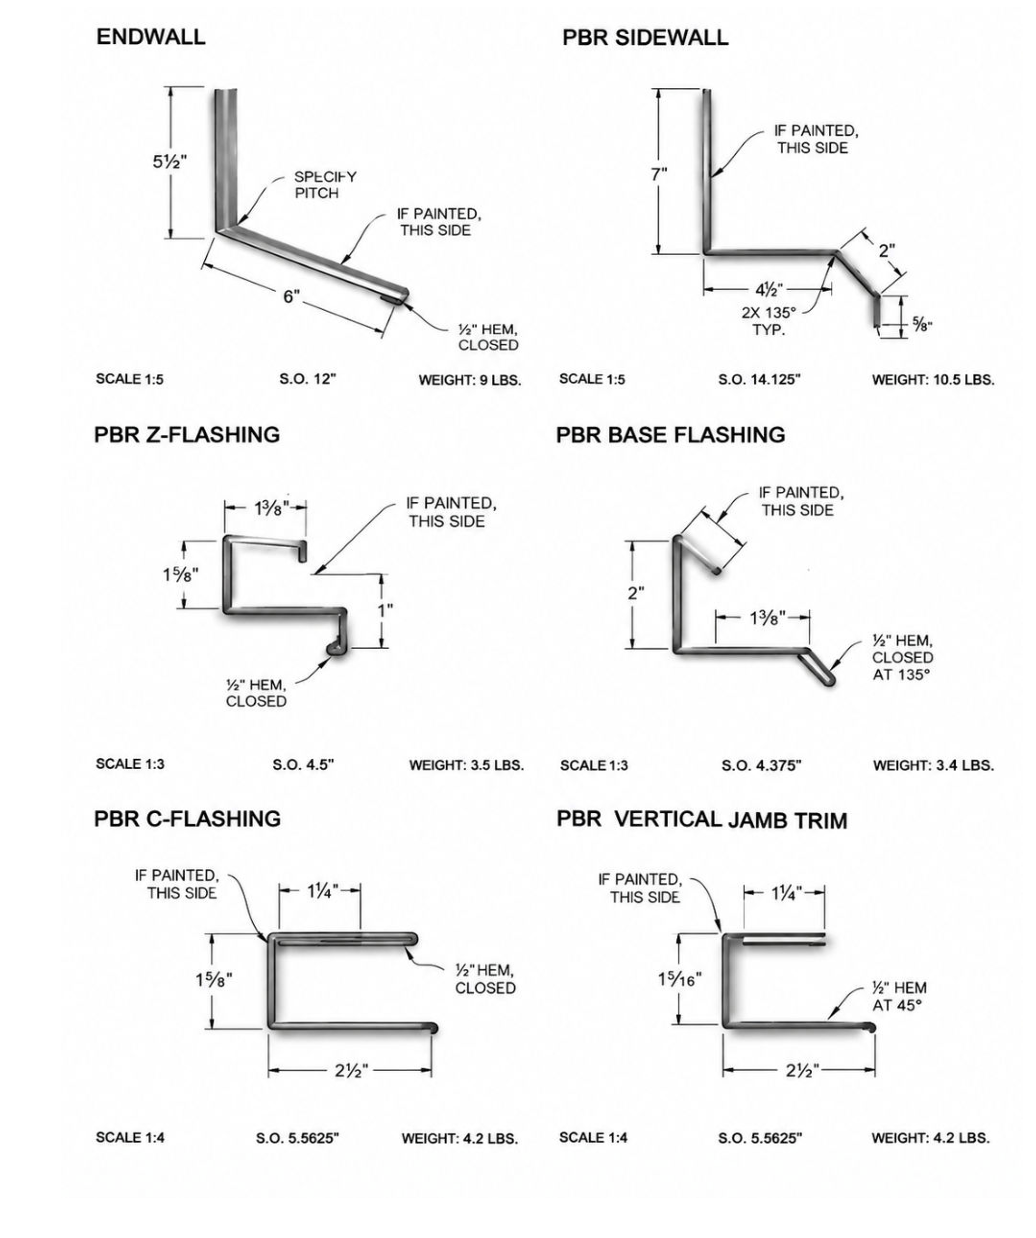
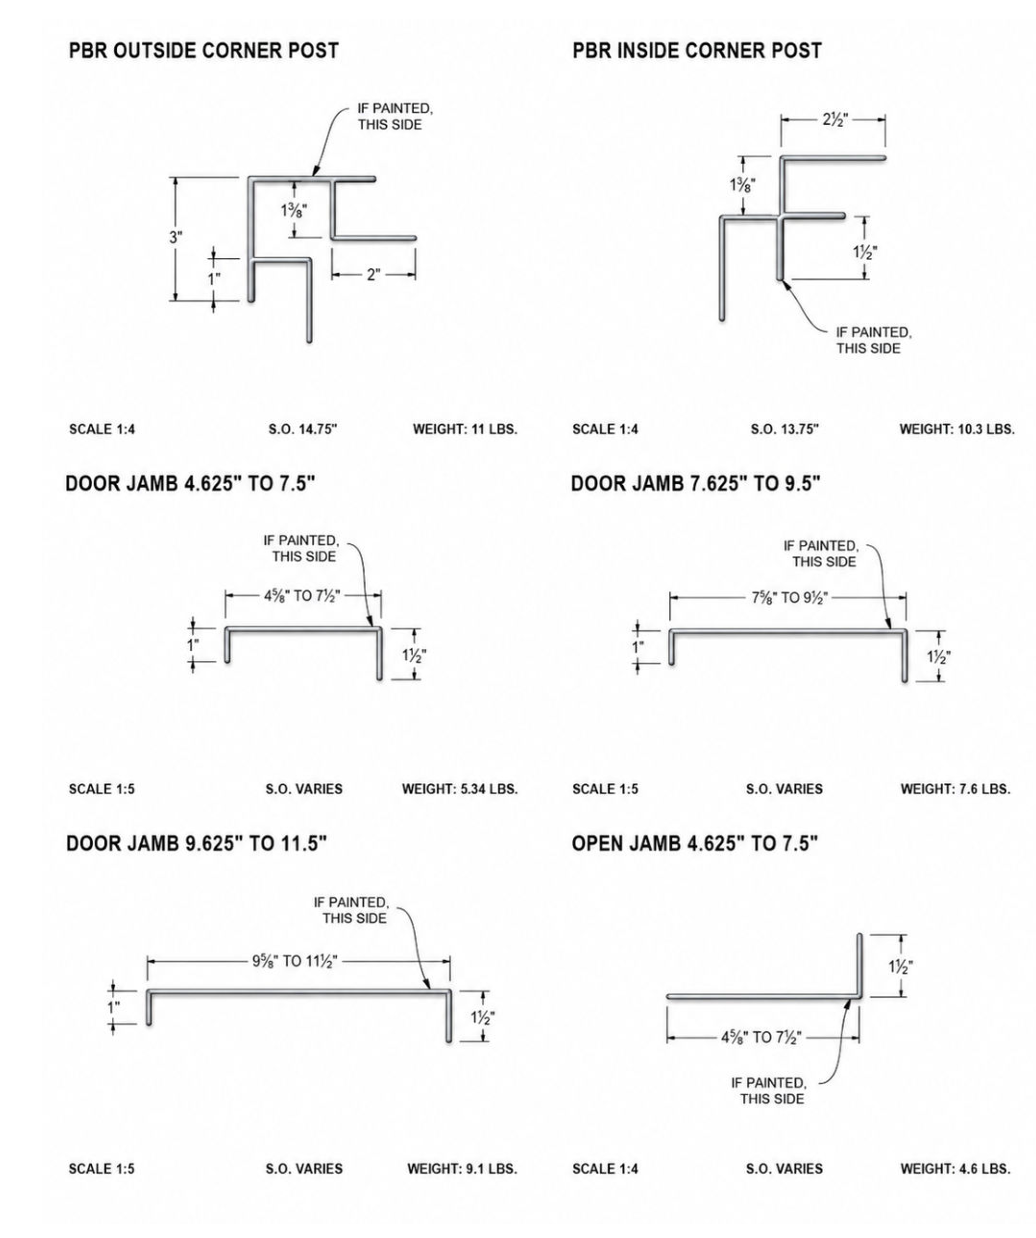
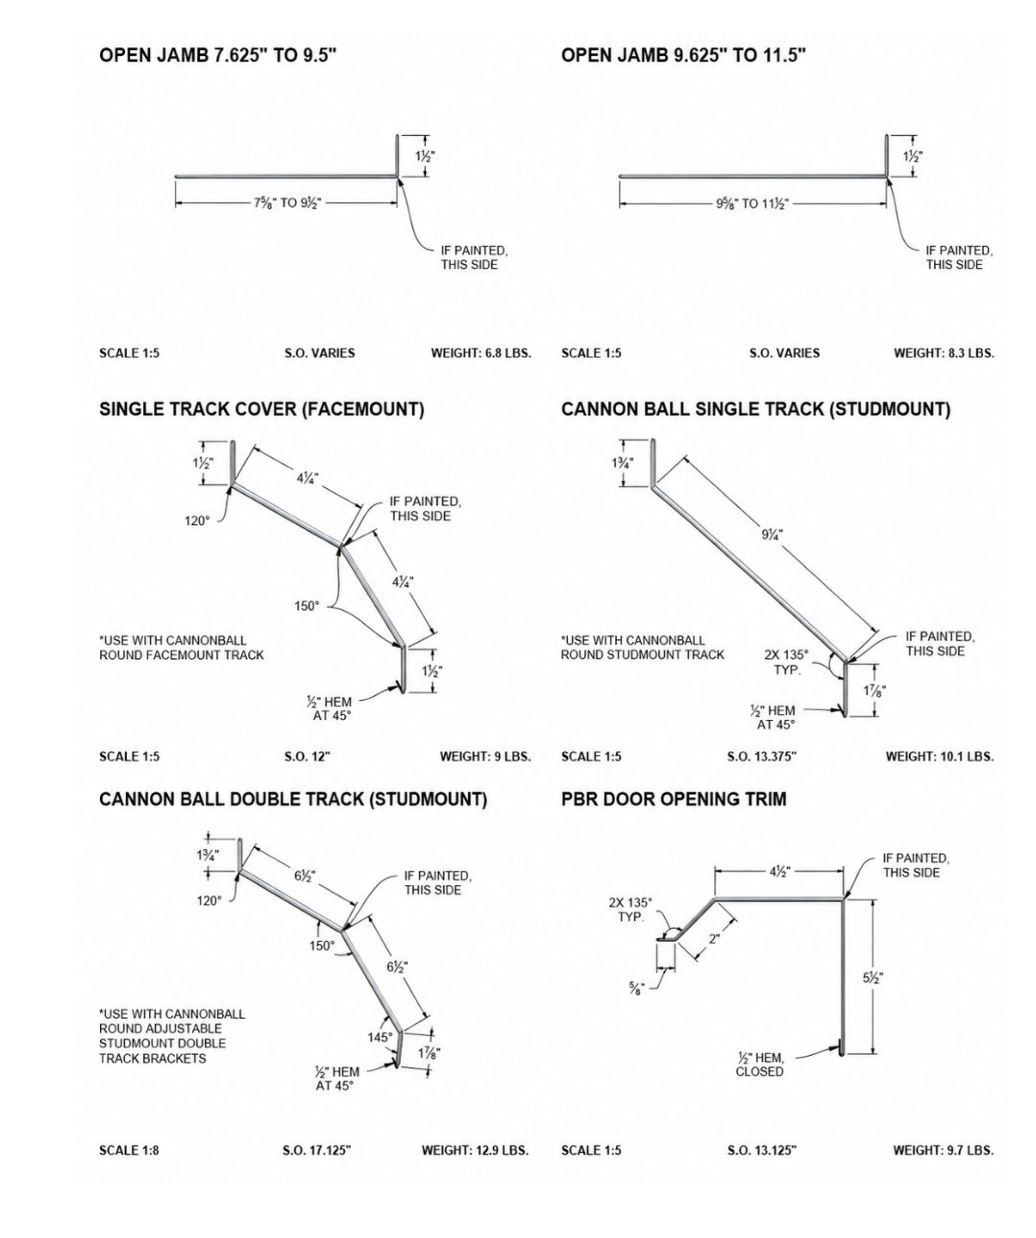
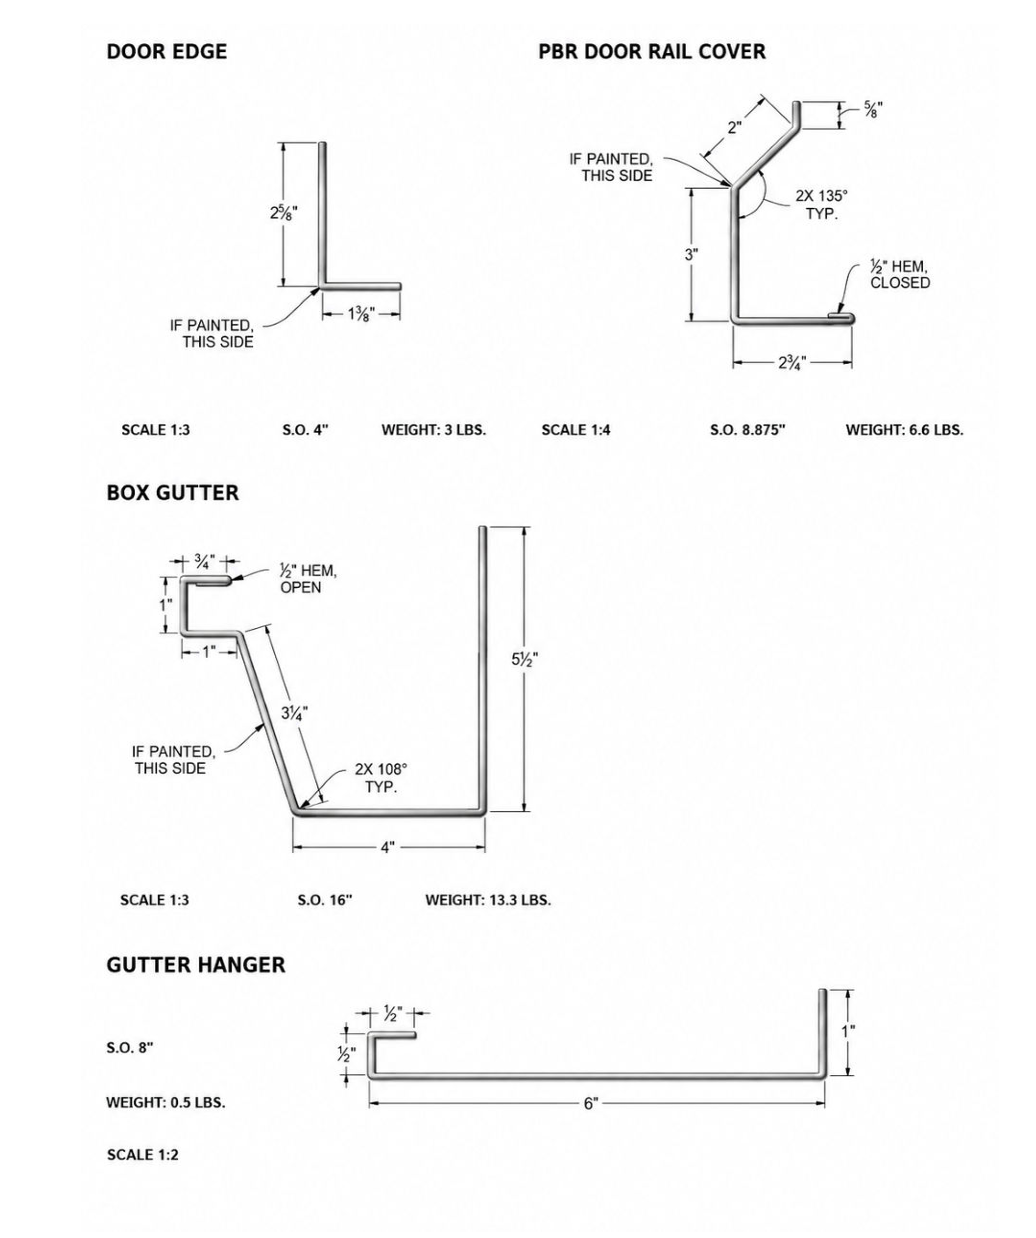
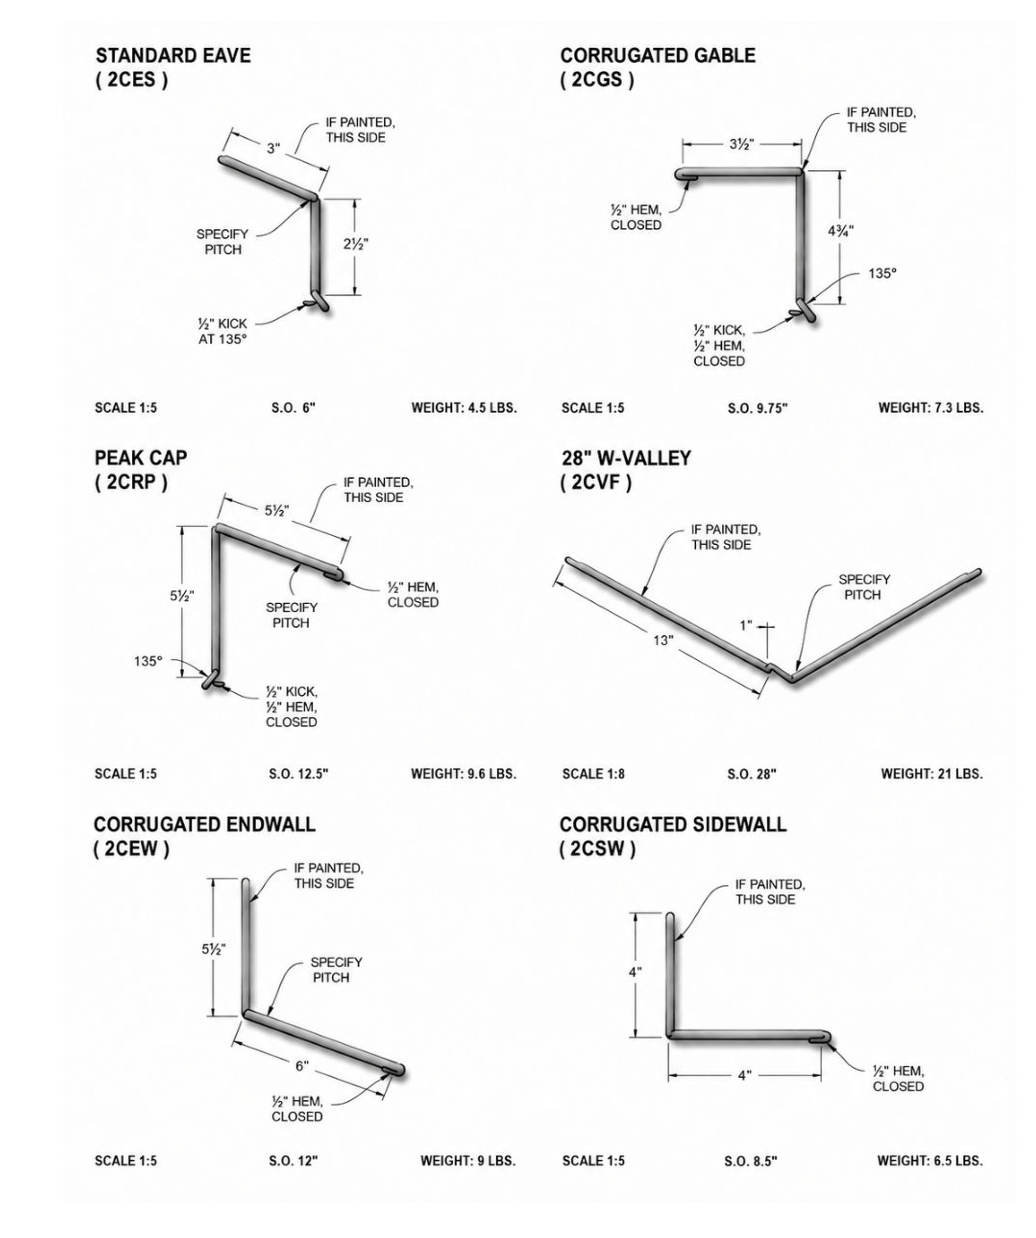
S3 Metals 7/8" corrugated panels are designed for durable roof and wall applications where strength, drainage, and a traditional corrugated profile are important. The system can be used across residential, agricultural, commercial, and architectural projects and is supported by a broad range of ridge, valley, eave, gable, sidewall, endwall, corner, pitch-change, door, and custom flashing details.
This installation guide provides recommended practices for panel preparation, fastening, roof and wall flashing, lap conditions, accessories, and common installation details. Project requirements may vary based on substrate conditions, drainage, wind, climate, building design, local codes, and engineering requirements. S3 Metals supplies materials only and does not provide installation, supervision, engineering, field measurement verification, or project design; responsibility for measurements, specifications, code compliance, safety, and installation remains with the appropriate project professionals and installer.
Thank you for considering S3 Metals..
David Hahne - Owner and Operator
TABLE OF CONTENTS
This guide is designed to work three ways. Read the complete installation guide directly on this page and bookmark it for future reference, use the Table of Contents to jump directly to the section you need, or download the full PDF for offline use in the office or on the jobsite.
DELIVERY & LOGISTICS
Handling of Corrugated Panels
Handle all panels, trim, flashings, and accessories with care during unloading, transportation, and installation to prevent damage. Long panels may require multiple lift points spaced evenly along the panel length to avoid bending, twisting, or permanent deformation. Contact S3 Metals for recommendations regarding handling, lifting, and transporting long-length panels.
When handling painted panels, aluminum, copper, or Zincalume® products, use clean gloves to minimize fingerprints, oils, and surface contamination. While fingerprints typically do not affect product performance, they may temporarily impact appearance until natural weathering occurs.
Wear clean, soft-soled footwear when walking on installed roofing panels. Dirt, gravel, metal shavings, and other debris attached to footwear can scratch painted surfaces and damage protective coatings. Avoid walking on panel ribs whenever possible and never walk on panels that have not been fully secured according to installation requirements.
Exercise caution when painting near installed roofing materials. Paint overspray may permanently affect the appearance and performance of coated metal surfaces. Wind can carry paint particles significant distances beyond the immediate work area.
Metal panels should not come into direct contact with pressure-treated lumber or other chemically treated materials that may cause corrosion. Use approved separation materials, such as self-adhered underlayment or membrane barriers, when contact cannot be avoided.
Material Storage for Corrugated Panels
Store all panels, flashings, and accessories in a dry, well-ventilated location on level ground. Bundles should be elevated off the ground and adequately supported to prevent sagging, distortion, or water accumulation. Slightly elevate one end of stored bundles to promote drainage.
If materials must be covered, ensure adequate airflow around and beneath the bundles to prevent moisture buildup and condensation. Standing water trapped between panels can cause staining, finish damage, and premature corrosion.
If materials become wet during storage or transportation, separate individual panels immediately, wipe dry with a clean cloth, and allow them to air dry completely before restacking.
Protective plastic film applied to panels, trim, or flat sheets must be removed prior to installation. Materials with protective film should not be stored in direct sunlight, exposed to UV sources, or subjected to extreme temperatures for extended periods, as prolonged exposure may make film removal difficult.
Secure all materials stored on the ground or roof to prevent movement caused by wind. Unsecured materials may result in product damage, property damage, or personal injury.
Safety Statement
Avoid installing roofing materials during high-wind conditions. Safe handling, installation procedures, and jobsite safety remain the sole responsibility of the installer.
Always follow applicable OSHA requirements, local safety regulations, and accepted industry practices. Use appropriate fall protection and personal protective equipment.
Customer Responsibilities
- Verify adequate site access before delivery is scheduled.
- Be present or have an authorized representative available at delivery.
- Provide unloading assistance, equipment, or labor as required.
- Inspect all materials upon delivery.
- Verify quantities against the packing list.
- Report any shortages, damage, or discrepancies within 48 hours.
Delivery Information
- Delivery schedules are typically confirmed one business day in advance.
- S3 Metals will make every reasonable effort to deliver materials on time.
- Delays caused by weather, traffic, road closures, equipment issues, or other factors beyond our control may occur.
- Customers will be notified of significant delays whenever possible.
Site Access Requirements
- Delivery locations must be reasonably accessible and safe.
- Narrow roads, steep grades, tight turns, overhead obstructions, or unsafe site conditions may prevent direct delivery.
- If necessary, materials may be delivered to an alternate location approved by the customer.
- Additional delivery charges may apply for special accommodations, return trips, or failed delivery attempts.
Material Responsibility
- Upon delivery or release of materials, responsibility transfers to the buyer.
- Materials should be inspected, secured, and stored in accordance with S3 Metals handling and storage guidelines.
ROOF PREPARATION
Click to Reveal Instructions and Guidance:
Installation Tools
- Variable-speed screw gun with adjustable clutch
- Extra batteries and charger
- Magnetic bit holder
- #2 Square Drive or Phillips bits
- 1/4" Magnetic Hex Driver
- 1/8" Drill Bit
- Tape Measure
- Chalk Line
- Marking Pen or Grease Pencil
- Rivet Tool
Cutting Tools
- Left and Right Offset Snips
- Left and Right Aviation Snips
- Electric Shears (recommended for long cuts)
Additional Tools
- Deburring Tool
- Hole Punch
- Rubber Mallet
- Framing Square or Speed Square
- Duckbill Pliers or Vise Grips
- Panel Upender Tools
- Tool Belt or Holster
New Construction
S3 Metals Snap-Lock roofing systems are designed for installation over a solid, continuous roof deck. A minimum 1/2" plywood or OSB substrate is recommended. Roof decking should be flat, secure, dry, and free of debris before installation begins. Install an approved roofing underlayment over the entire roof surface in accordance with local building codes and manufacturer specifications. Follow all underlayment overlap and fastening requirements to ensure proper moisture protection.
Re-Roof Applications
Snap-Lock panels may be installed over a single layer of existing asphalt composition roofing were permitted by local building codes and where the existing roof surface is flat, secure, and in good condition.
Before Installation
- Inspect the roof deck for damage, rot, or structural deficiencies.
- Repair or replace damaged sheathing as necessary.
- Remove loose materials, protruding fasteners, moss, and debris.
- Verify compliance with local code requirements regarding roof overlays.
Roof Surface Considerations
- Proper attic and roof ventilation are critical to long-term roof performance.
- Follow all local building code ventilation requirements.
- Ridge ventilation openings should be installed where applicable.
- Use approved vent materials and insect screening.
- Provide adequate airflow between insulation and roof decking.
- Insufficient ventilation can contribute to moisture buildup, reduced roof life, and premature deterioration of materials.
Insulation:
Insulation design should comply with local building codes and project-specific energy requirements. Consult the project's architect, engineer, or insulation professional when determining insulation specifications.
Touch-Up Paint
- Minor scratches and handling marks should be repaired using manufacturer-approved touch-up paint.
- Apply paint only to the affected area.
- Use a fine brush or applicator rather than spraying directly onto the panel.
- Excessive touch-up paint may create visible color variations over time.
- Touch-up paint is intended for minor repairs and should not be used to repaint large panel surfaces.
Substrate Statement
S3 Metals Snap-Lock panels are intended for installation over a solid, structurally sound substrate. A minimum 1/2" plywood or OSB roof deck is recommended unless project-specific engineering or approved construction details require otherwise.
RECOMMENDED FASTENERS
Recommended Fastenters
Pancake Head Screw

- #10 x 1", 1-1/2" 1/4" Hex Head
- Color Matched
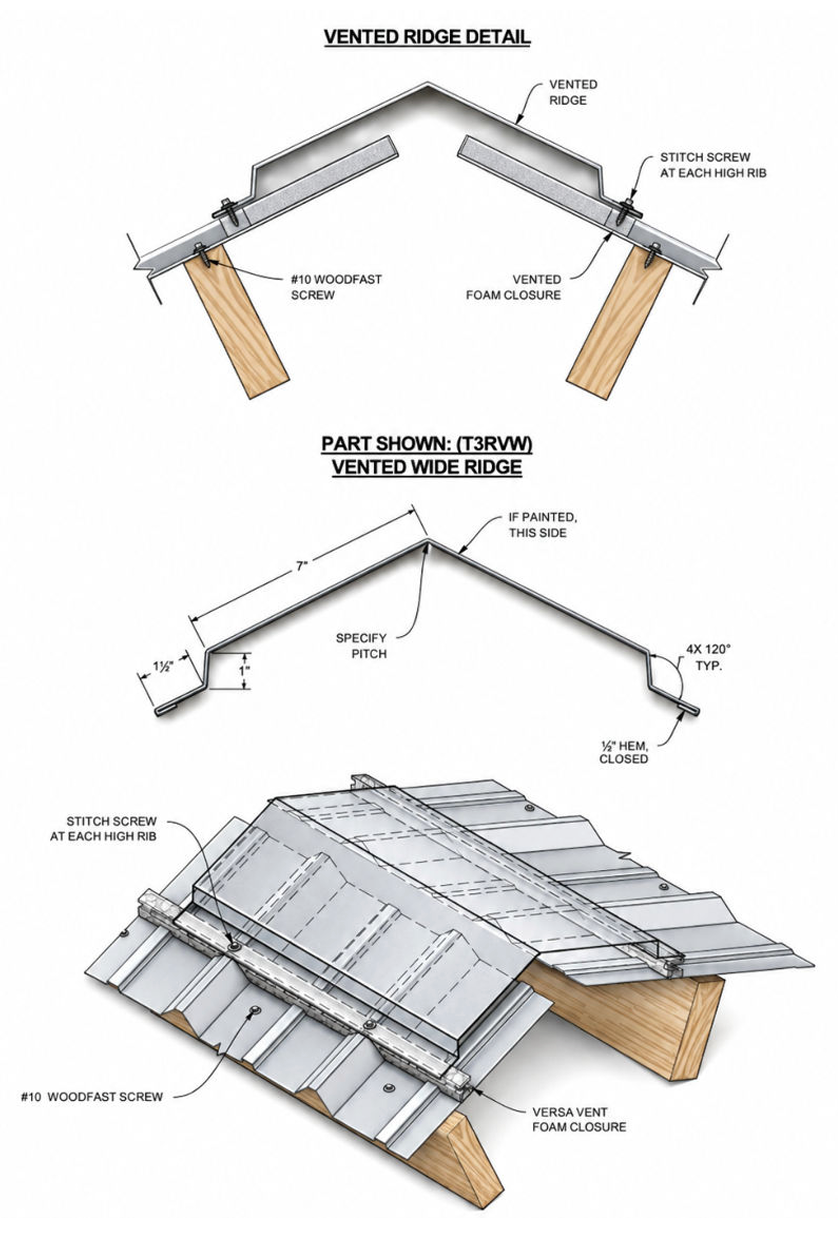
#10 Woodfast screws are used to attach panel to dimensional lumber.
Woodfast Screw
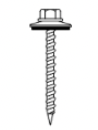
- #14 x 1", 1-1/2" 5/16" Hex Head
- Color Matched
#14 Woodfast screws are used to attach the panel to plywood/OSB.
Stitch Screw
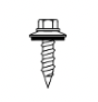
#12 x 3/4" 1/4" Hex Head Color Matched
Stitch Screws are used to attach metal to metal such as lap joints, trim to trim, trim to panel and side lap attachment. They can be used interchangeably with rivets.
Tek Screw 1 - 1/2"
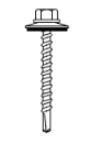
#12 x 1", 1-1/2" 5/16" Hex Head
Tek Screws are used for attaching panels to metal purlins.
Tek Screw 7/8"

#14 x 7/8" 5/16" Hex Head
Tek Screws are used for attaching panels to metal purlins.
Blind Rivet
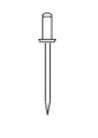
#43 (1/8" x 1/8") Stainless Steel rivet
Color Matched or non-painted
Rivets are used to attach metal to metal such as lap joints, trim to trim, trim to panel and side lap attachment.
Fasteners for Corrugated Panels
- Fasteners should be installed according to the maximum recommended row spacing (see below.)
- Fasteners should be applied along each rib and to each purlin (see illustration below).
- In high wind areas the bottom row of panel fasteners should be applied with fasteners along both sides of each rib and on panel laps (see illustration below).
- When possible, lap panels away from prevailing wind direction.
- Stitch screws should be used on panel laps for all applications (12" o.c. maximum).
- Panel screws should be long enough to penetrate through the bottom of the plywood by 3/8".
- For dimensional lumber (2 x 6), panel screws should penetrate the lumber 1".
- All fasteners used for roof or wall applications should have EPDM sealing washers.
- Use a 2000 rpm depth-sensing nose piece screw gun to ensure proper fastener seal.
- Do not over drive or under drive fasteners (see illustration on page 8).
- Do not use #9 woodfast screws for attachment into plywood. #9 woodfast screws are designed to penetrate dimensional lumber. Use #14 fastener for plywood attachment.
- Clean off working area each day to remove metal particles left from drilling fasteners. These particles, when exposed to moisture, will form rust between metal particles and
- the panel.
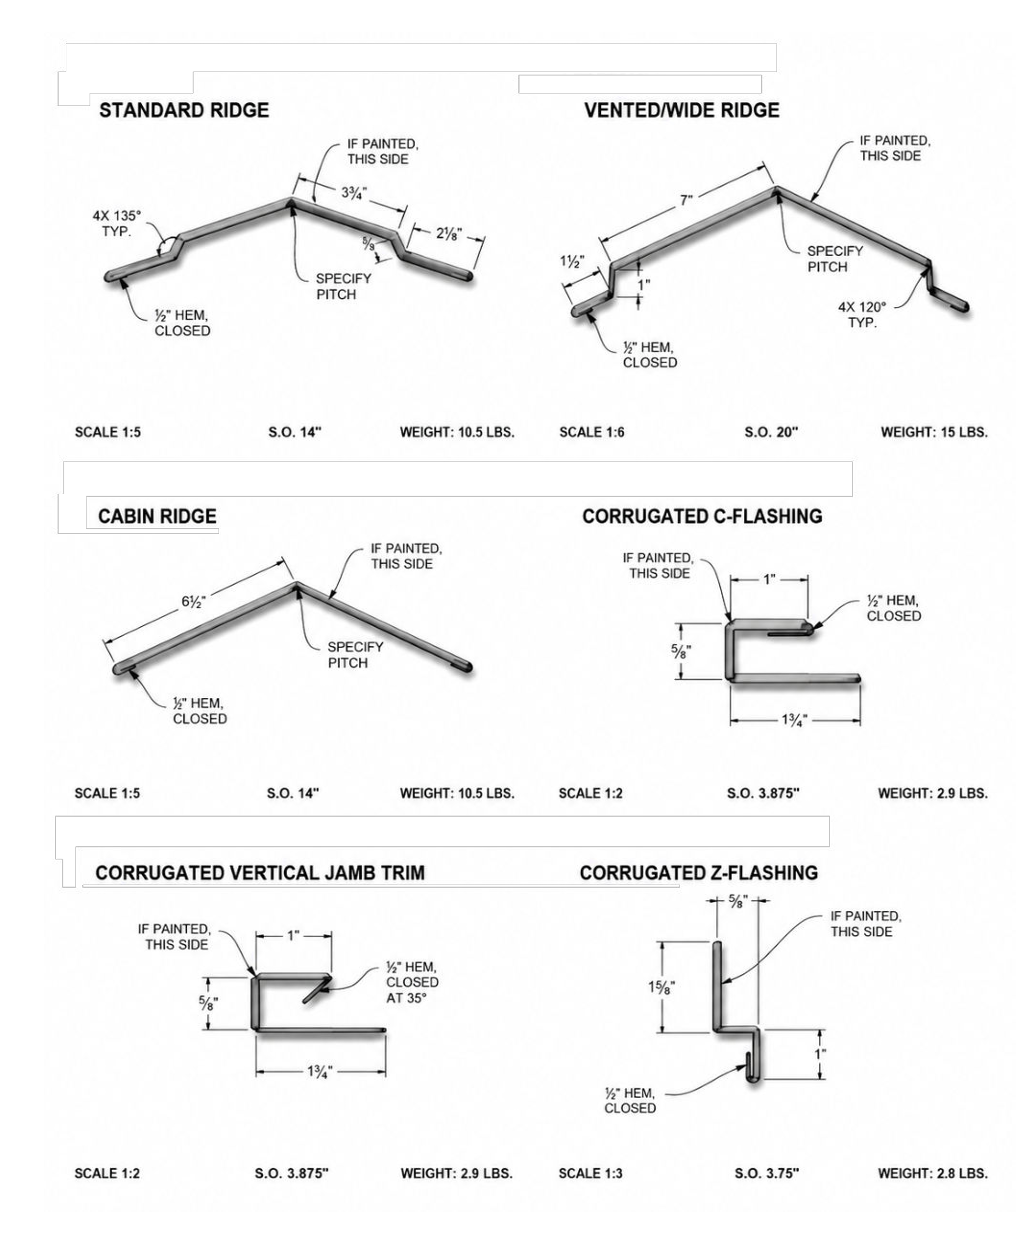
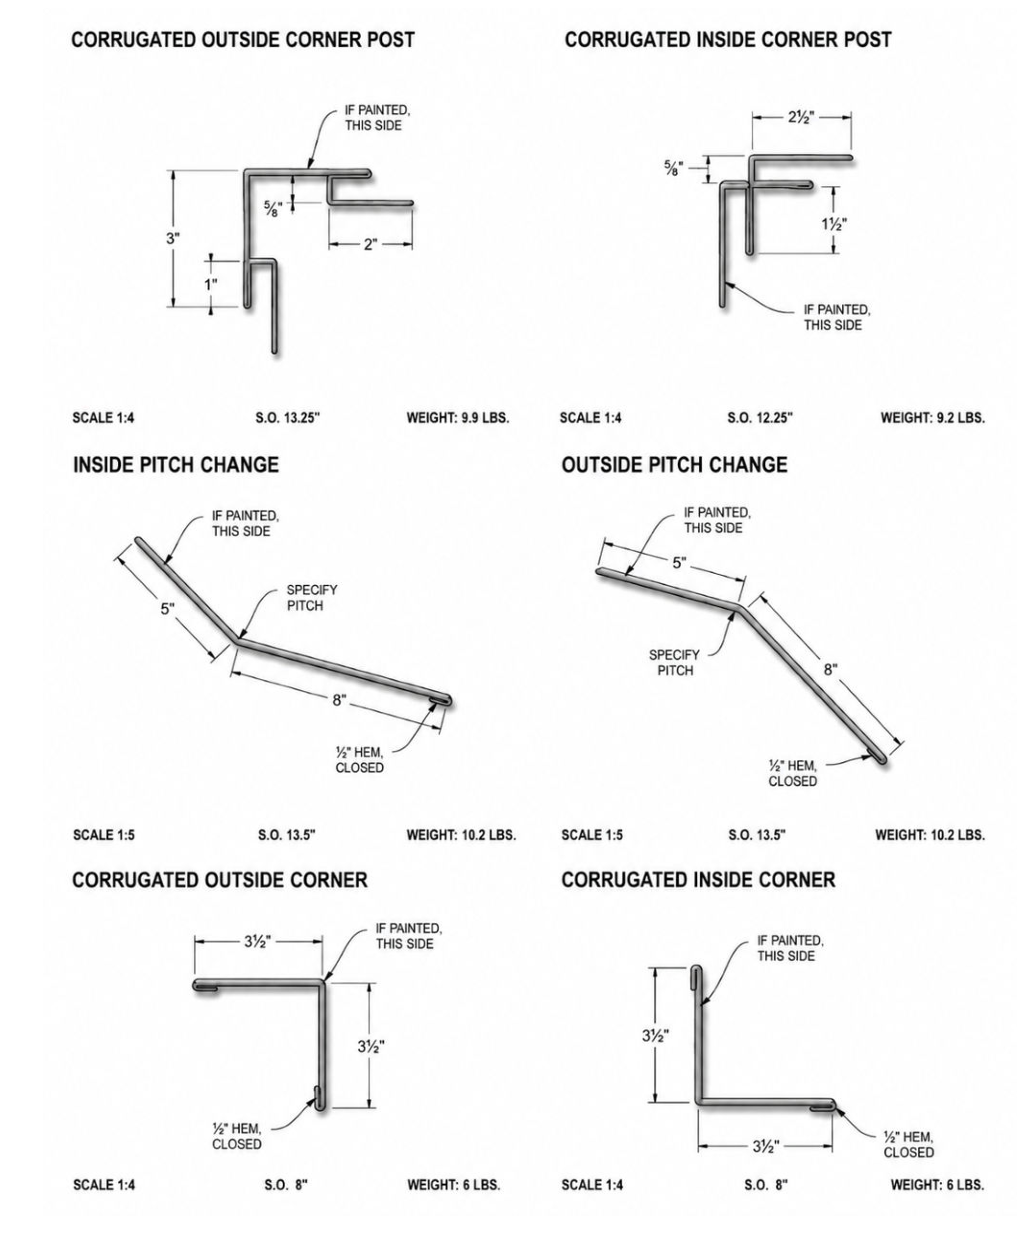
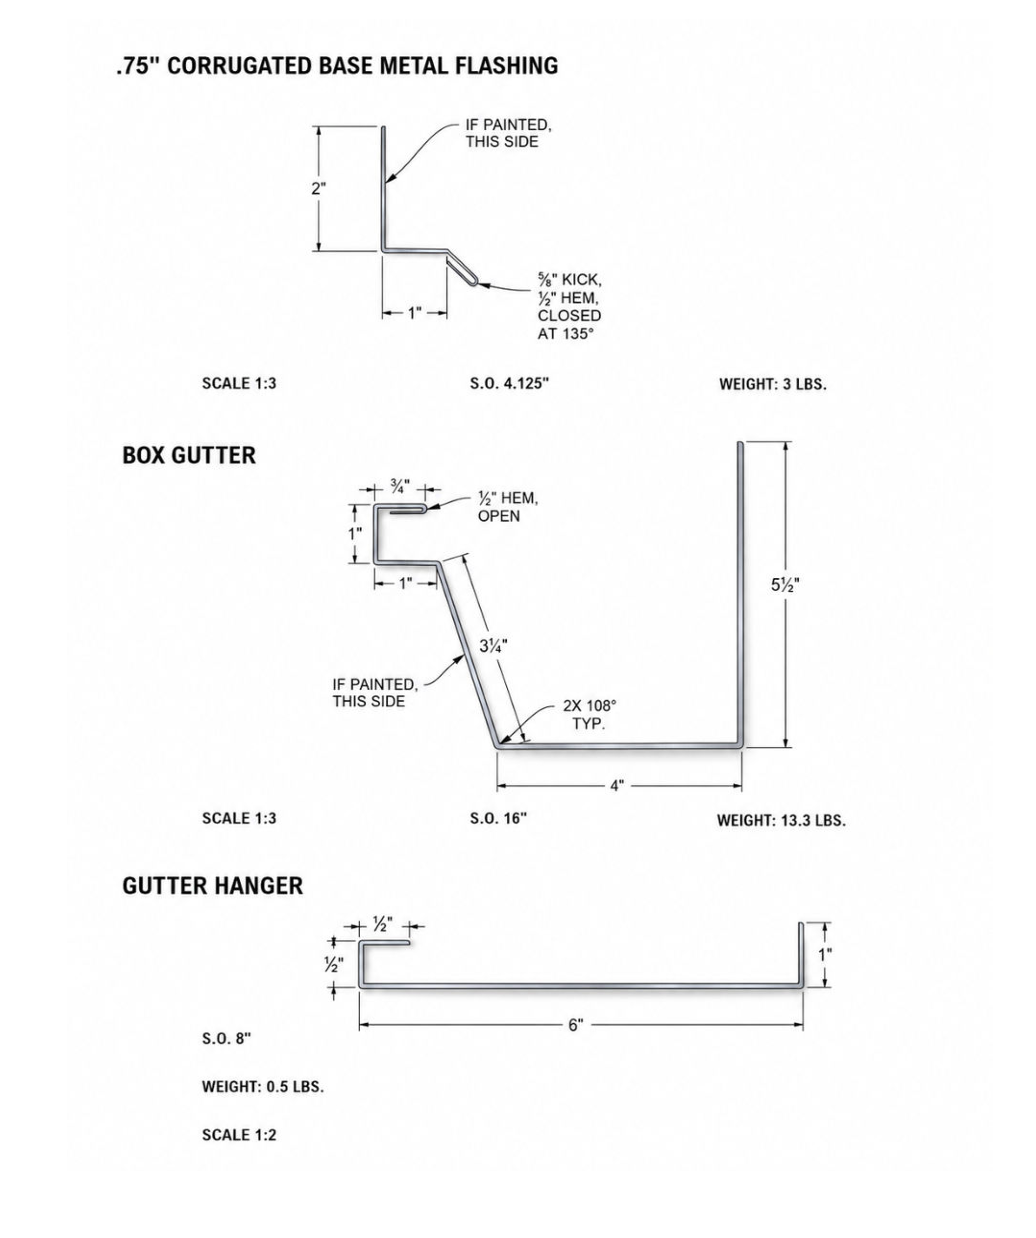
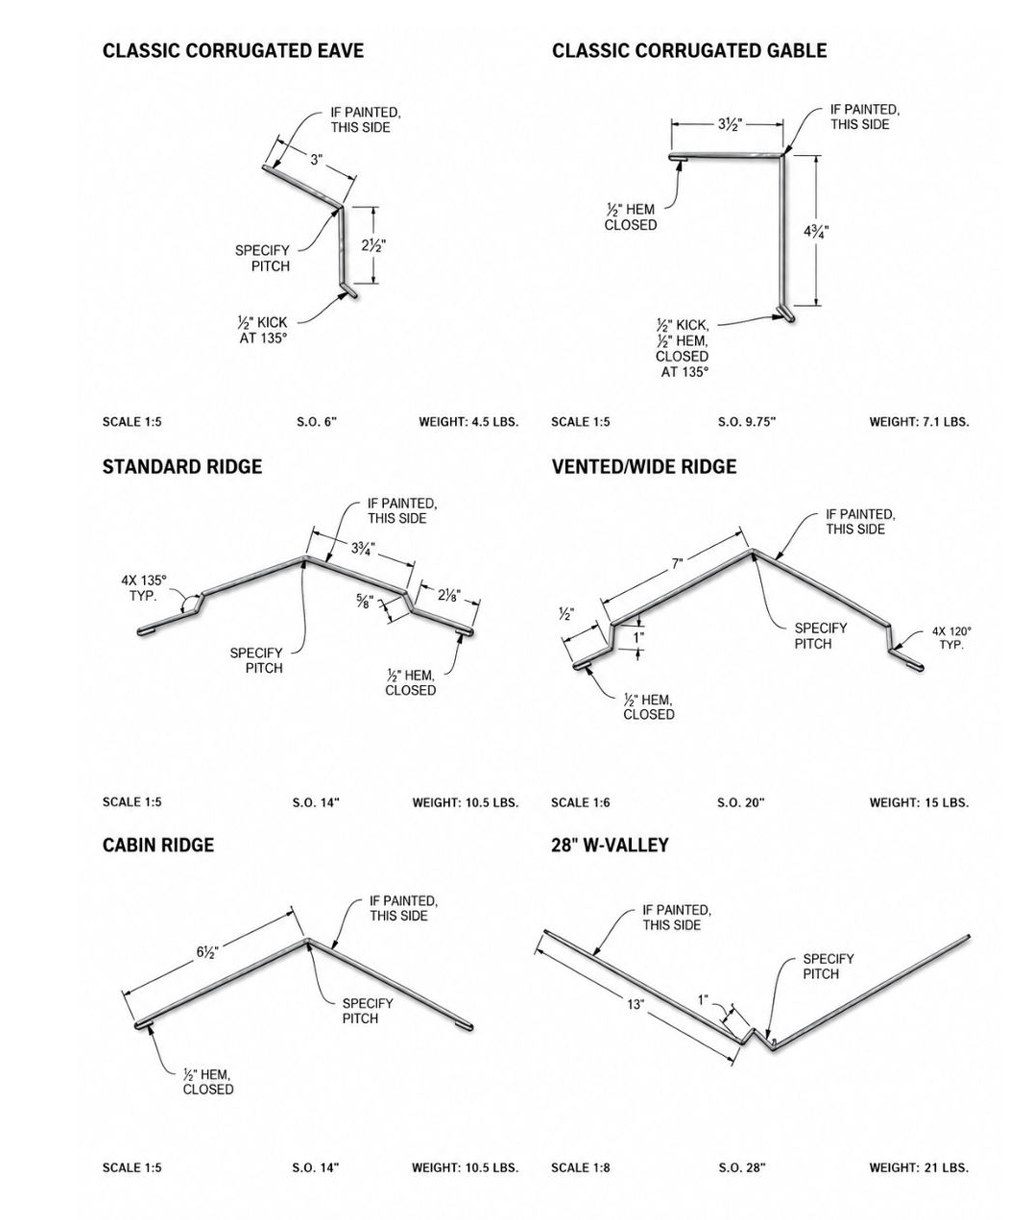
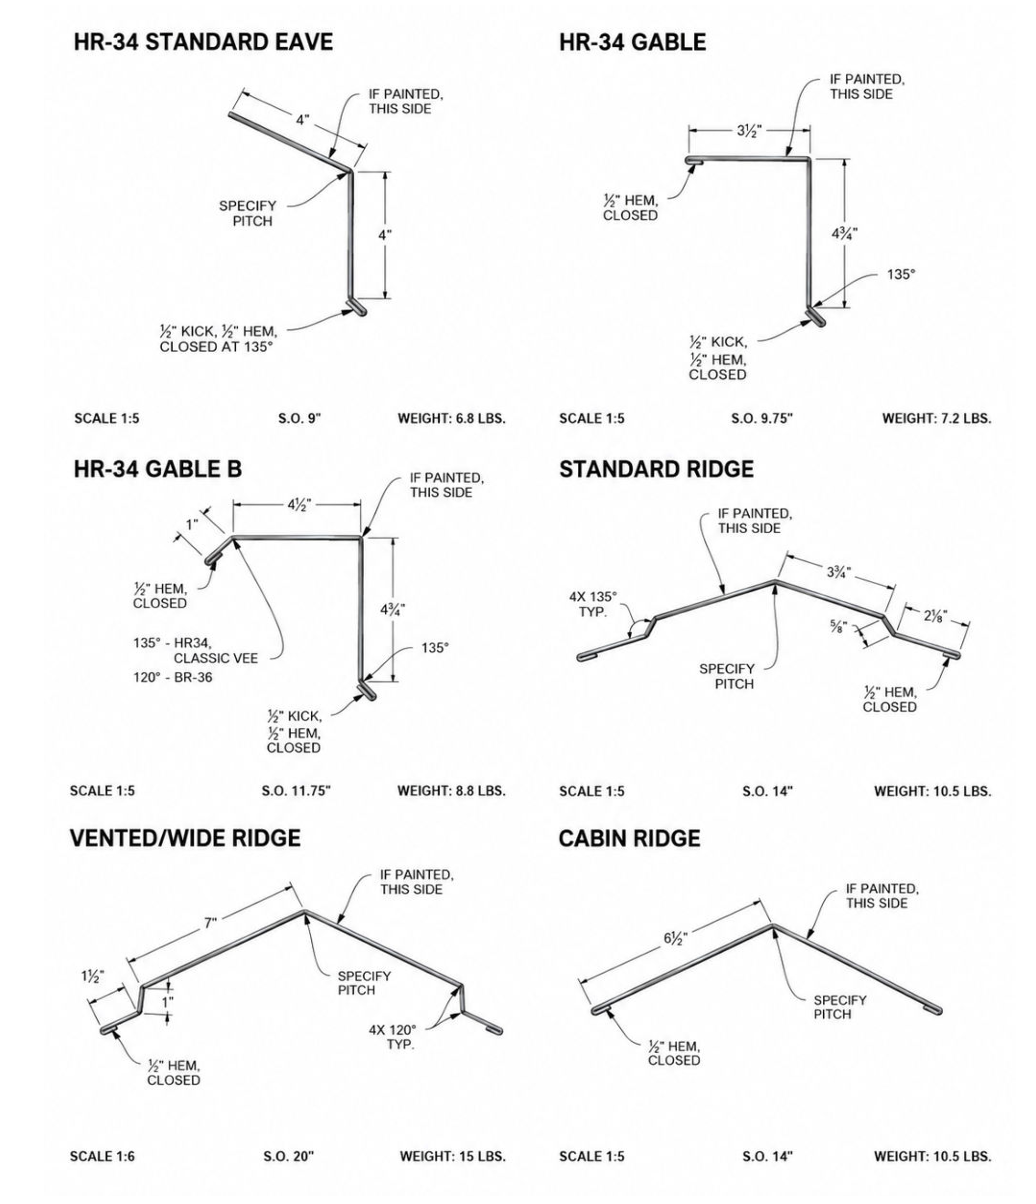
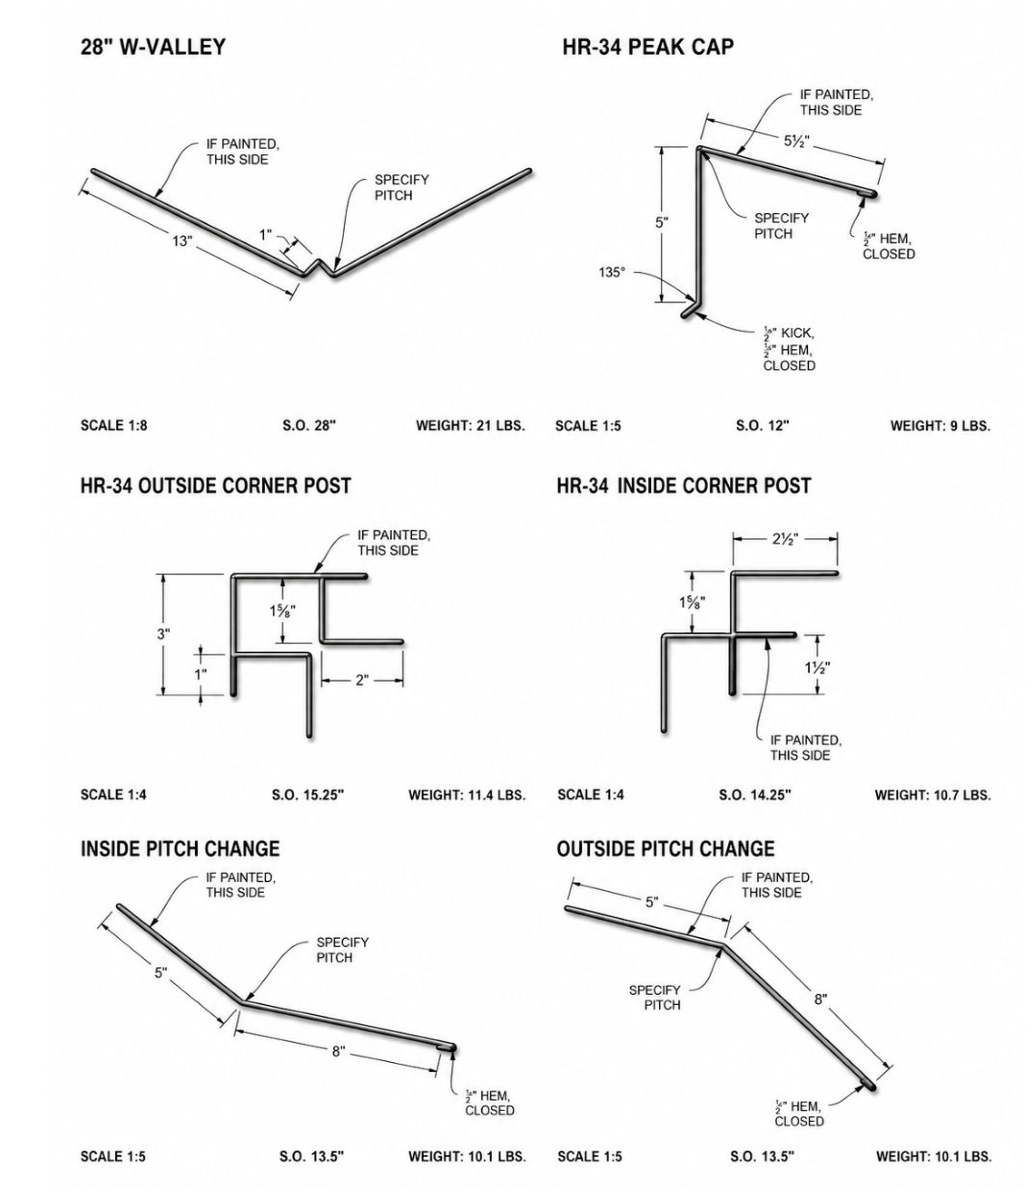
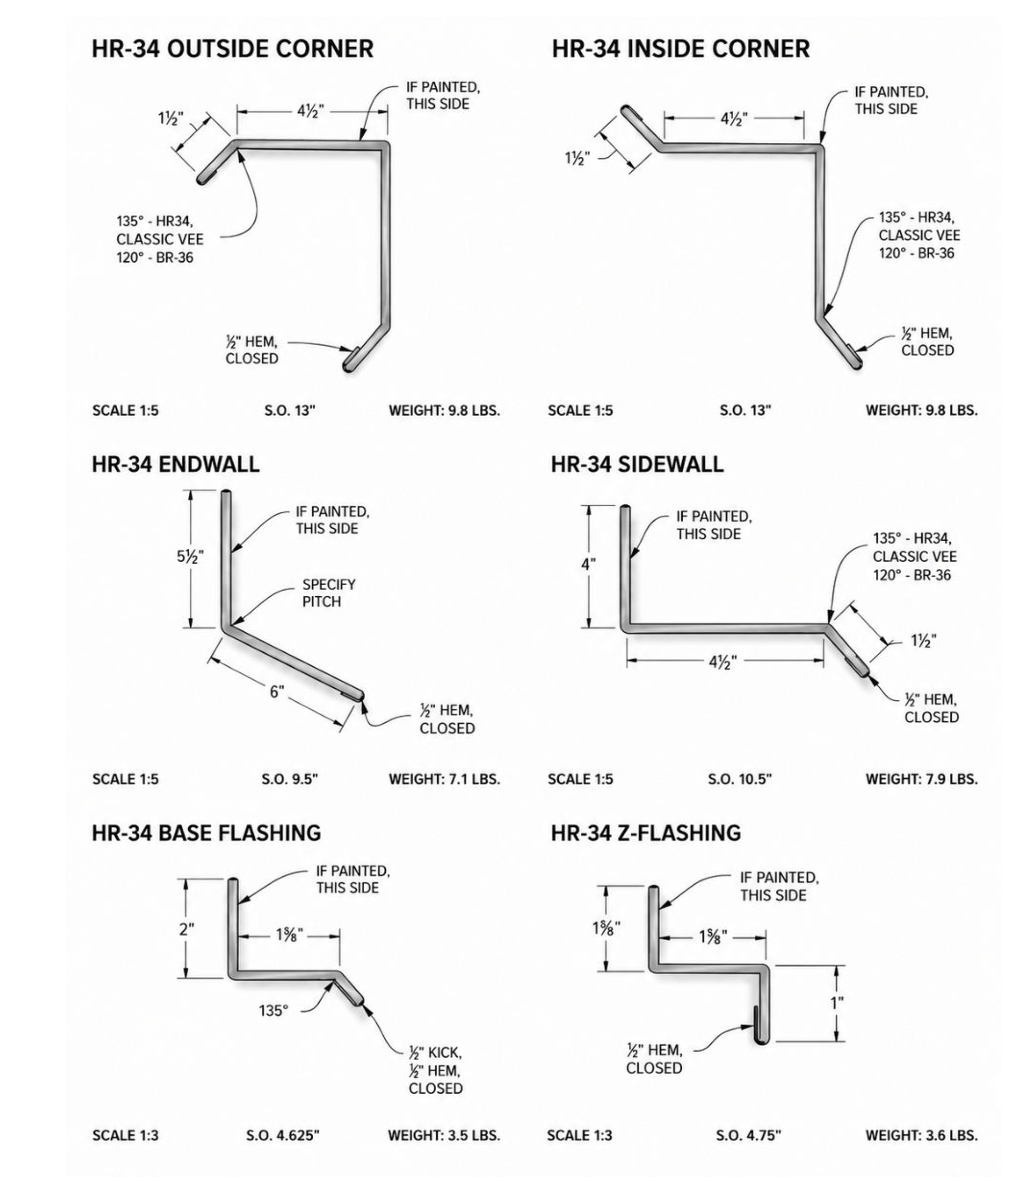
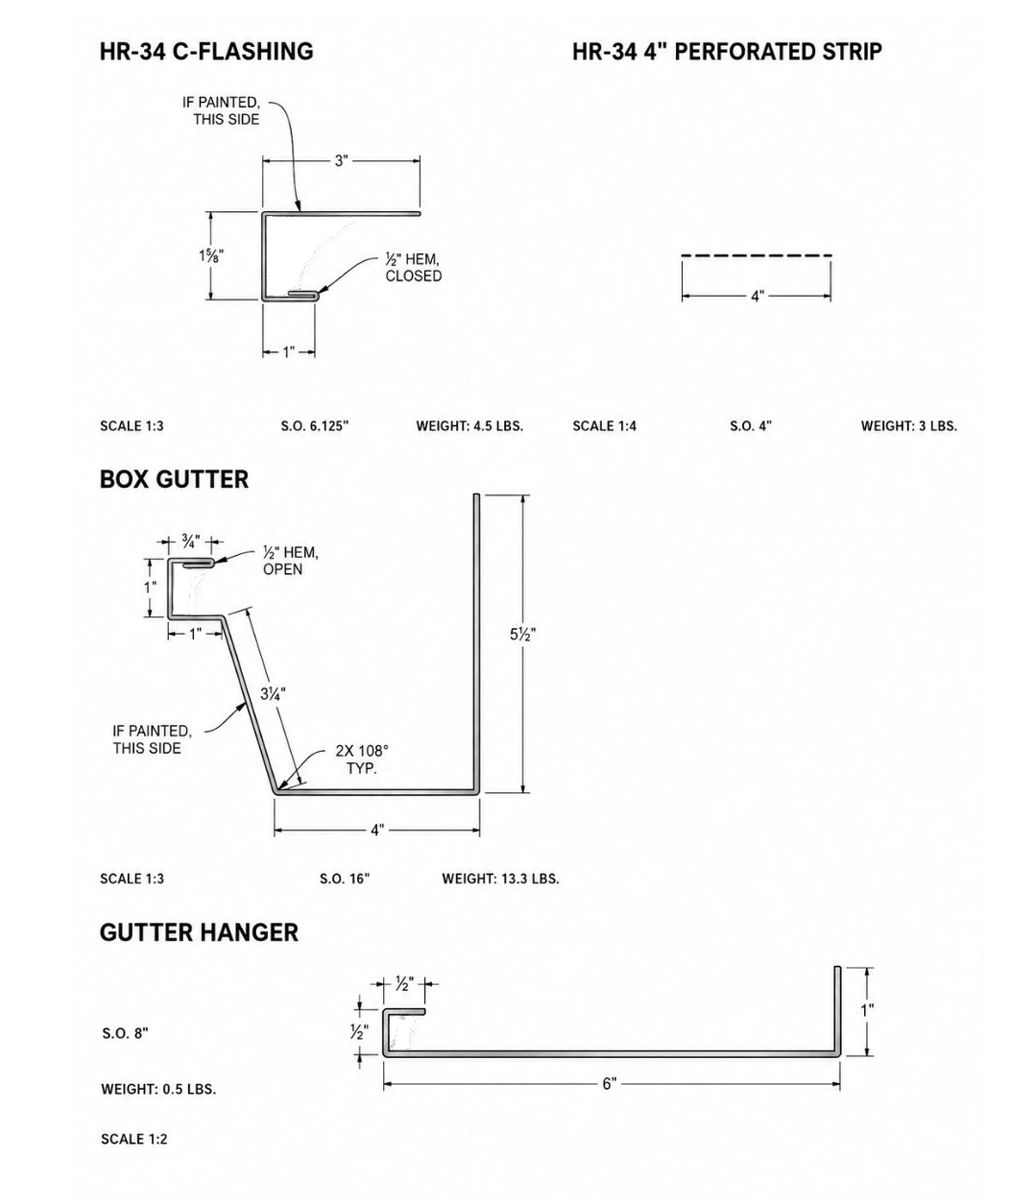
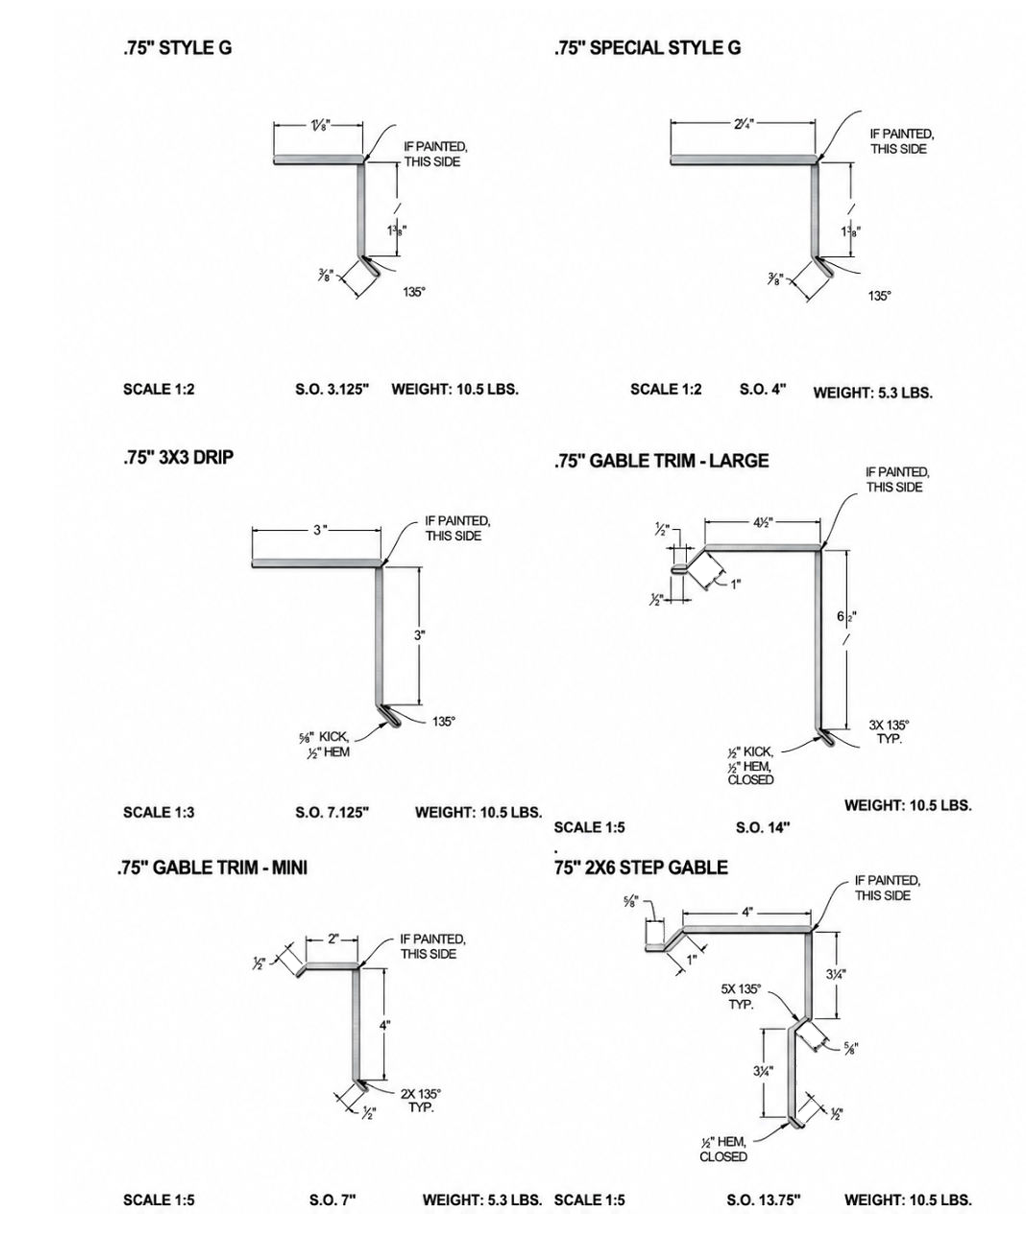
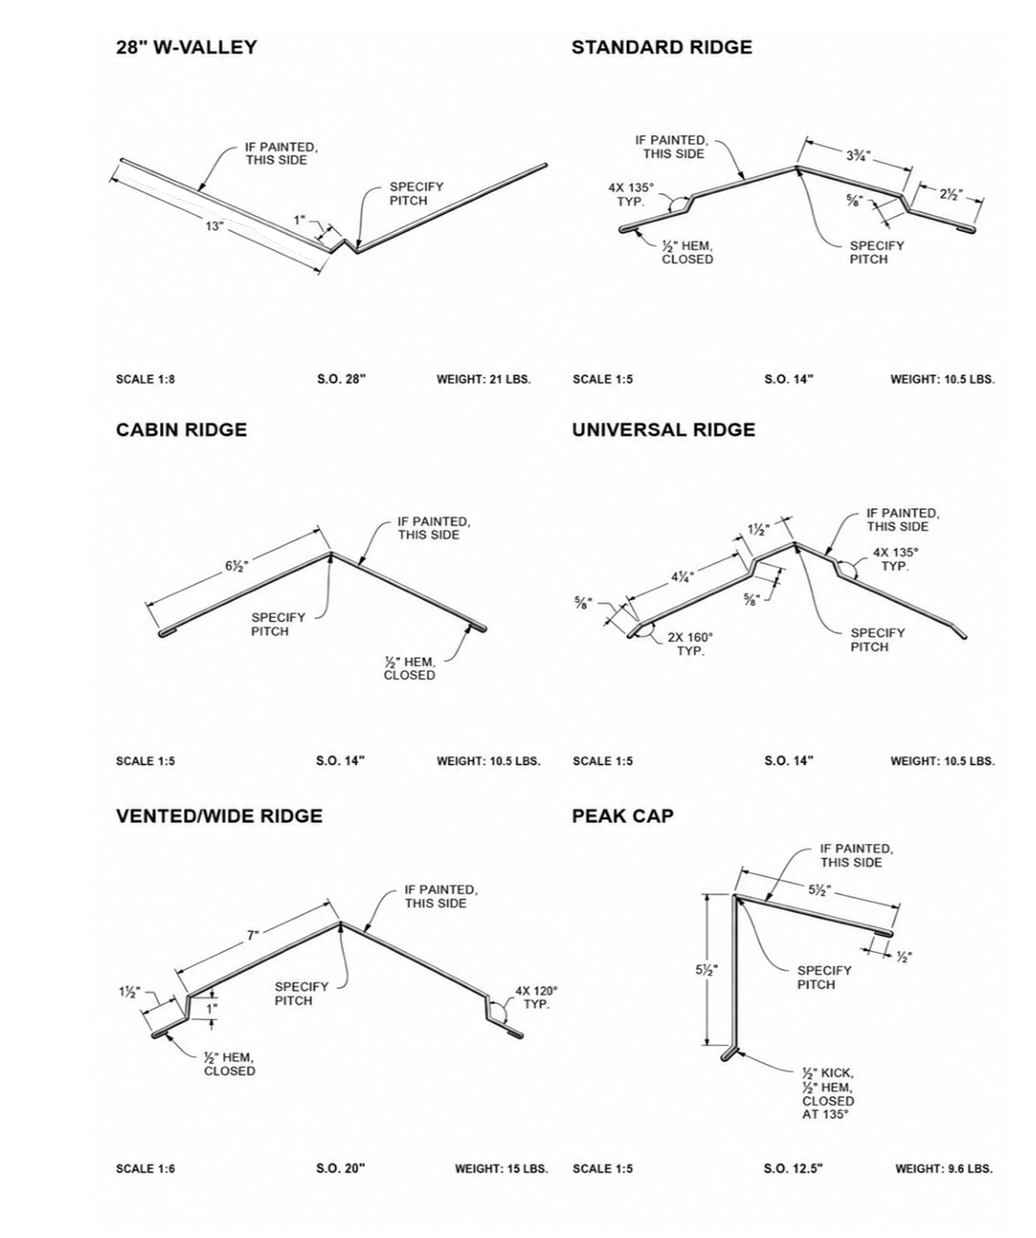
Profile Chart
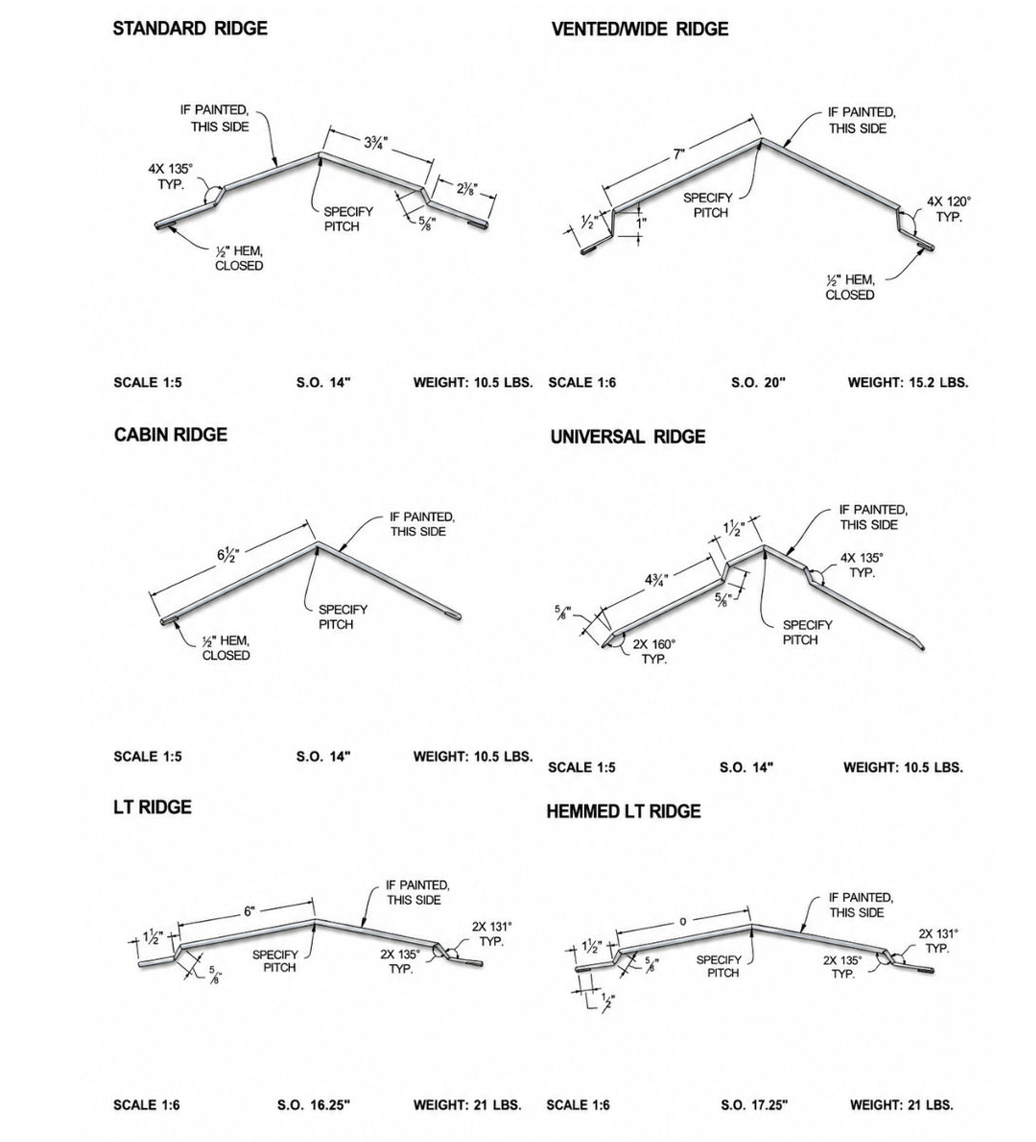
Cabin Ridge
VENTED RIDGE DETAIL

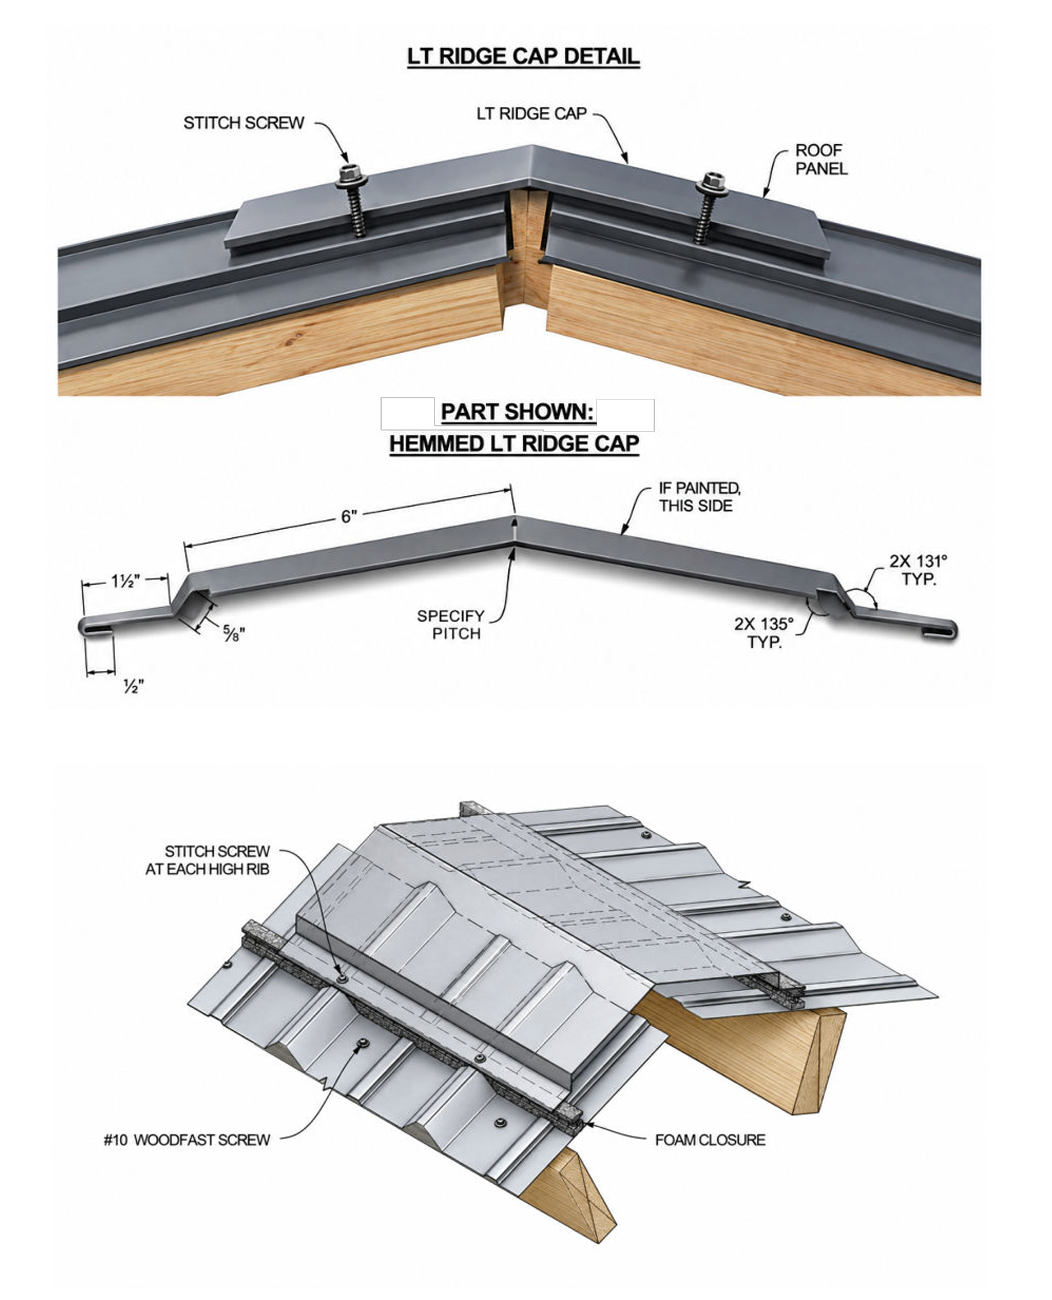
LT RIDGE DETAIL

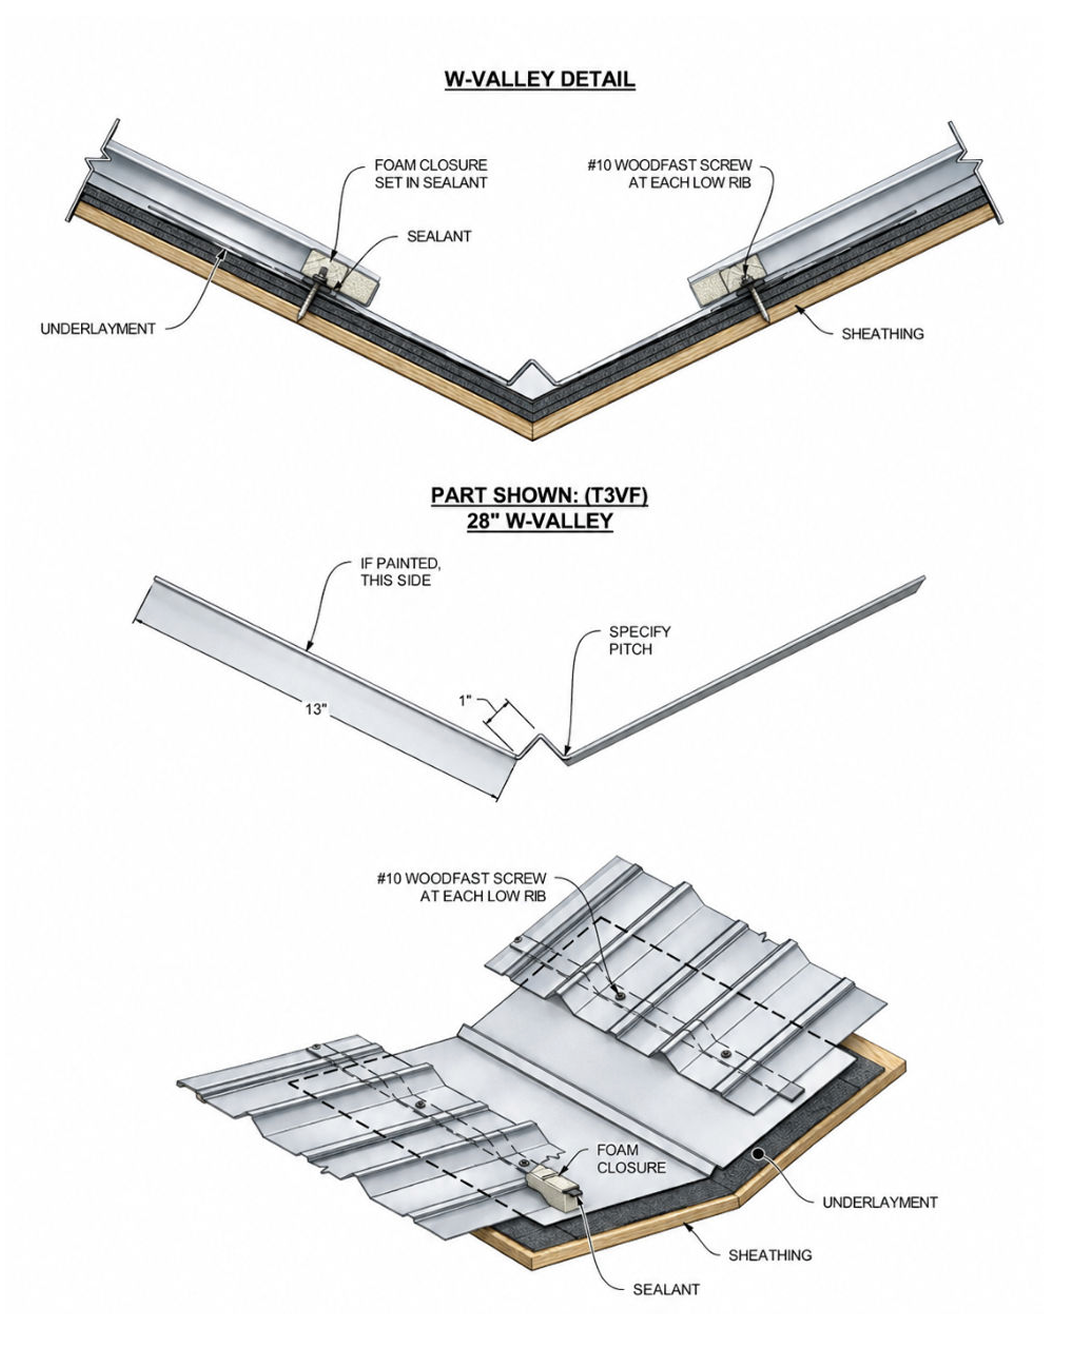
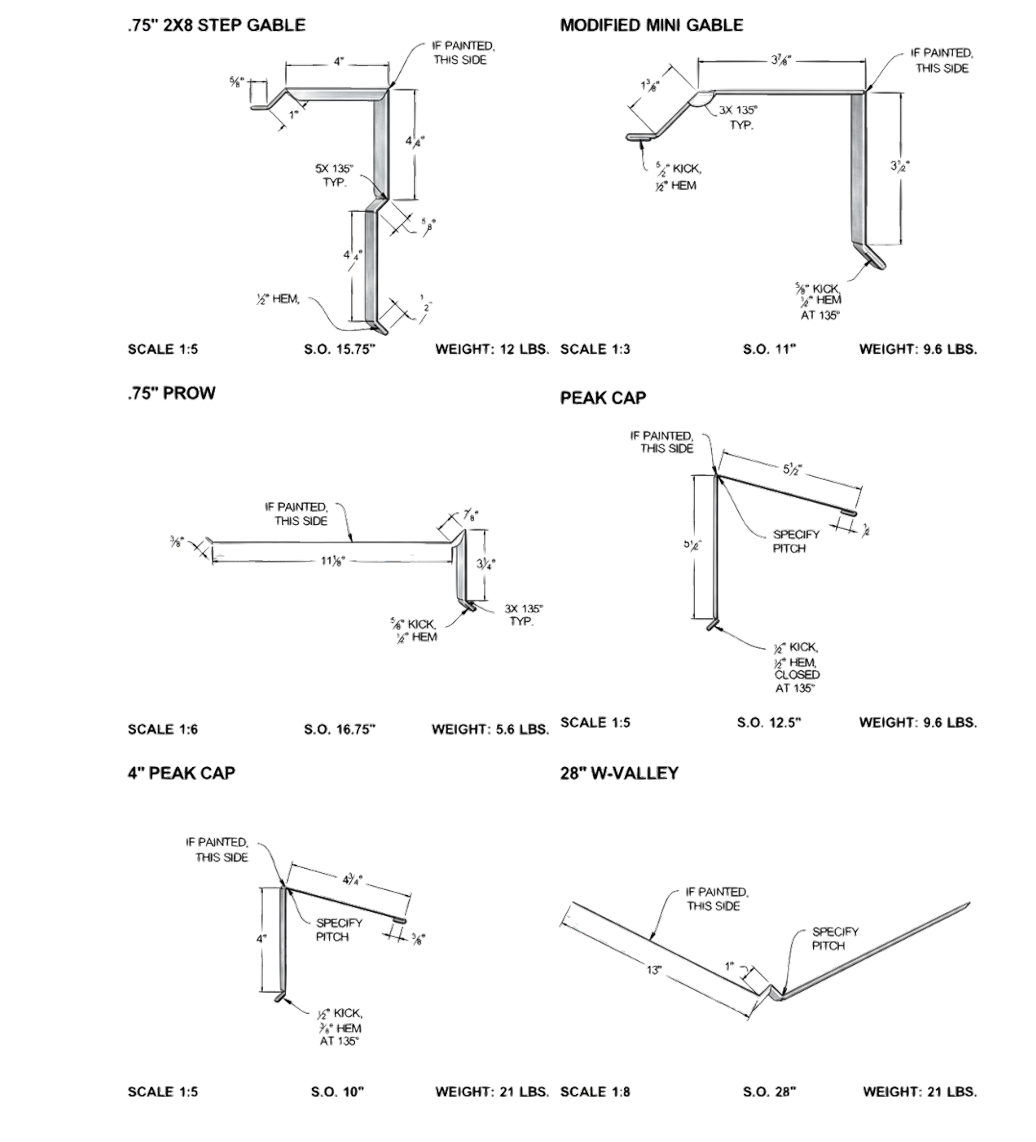
WV VALLEY DIAGRAM

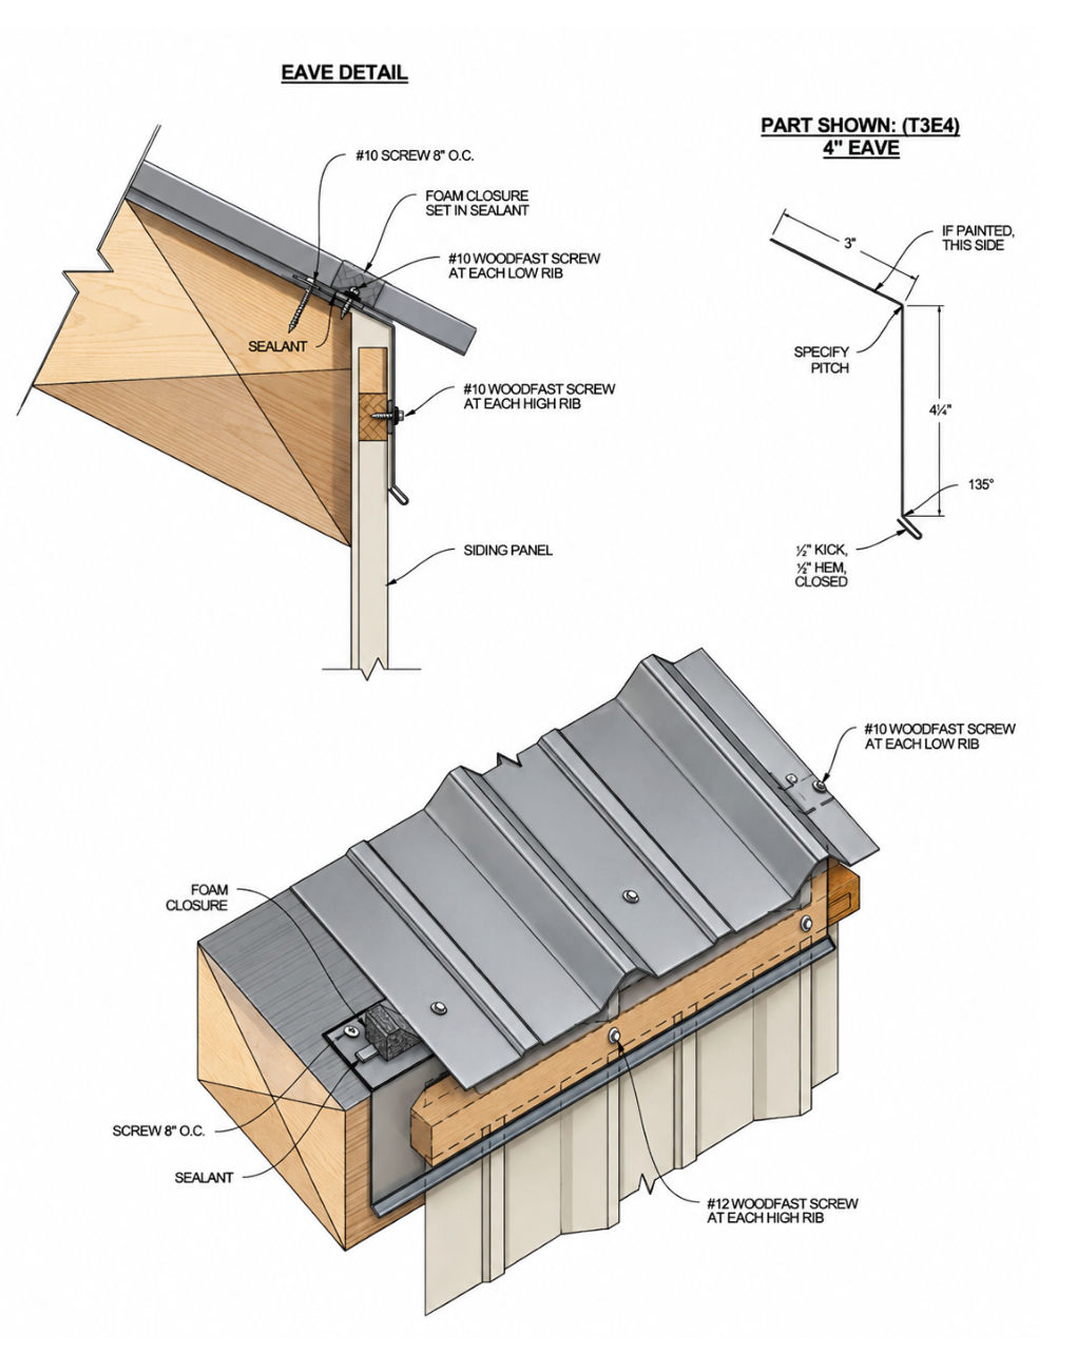
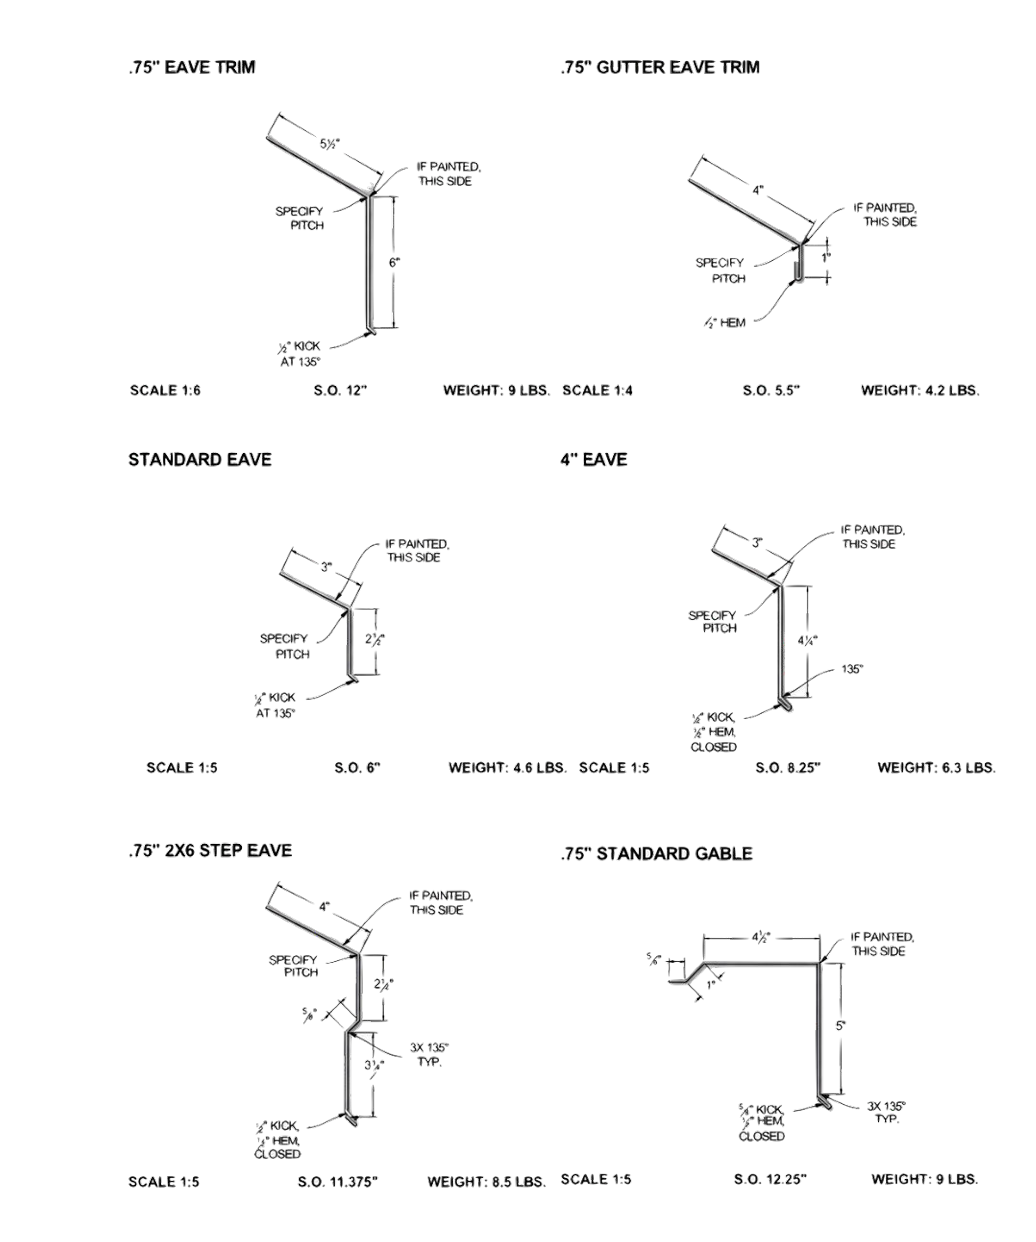
EAVE DIAGRAM

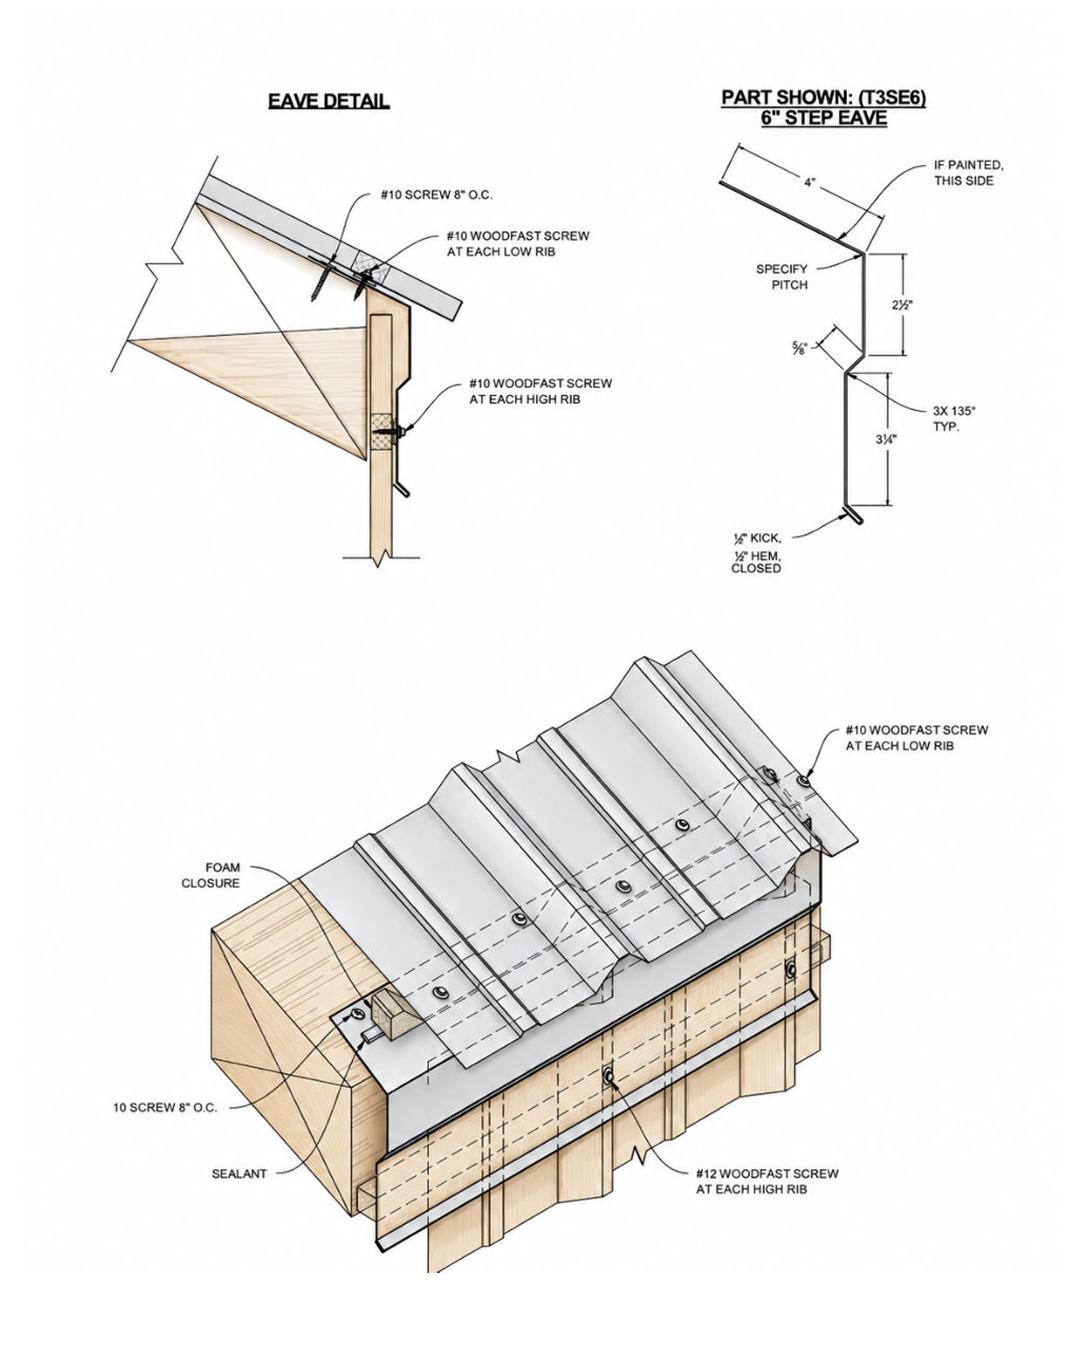
STEP EAVE DIAGRAMS

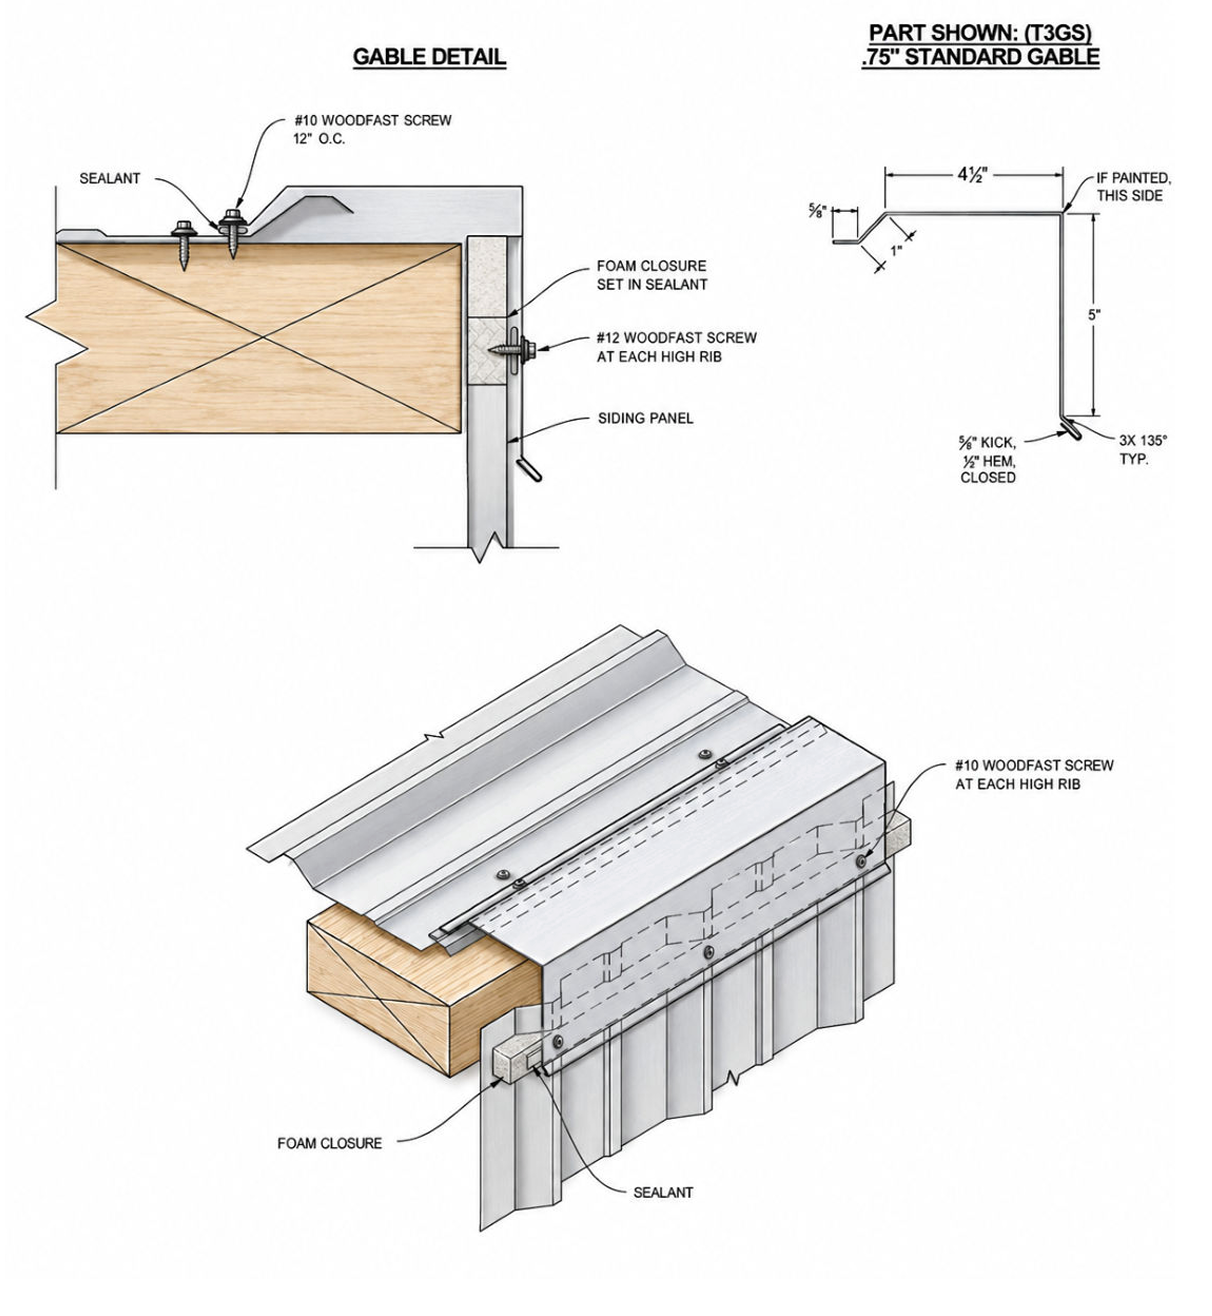
GABLE DIAGRAMS

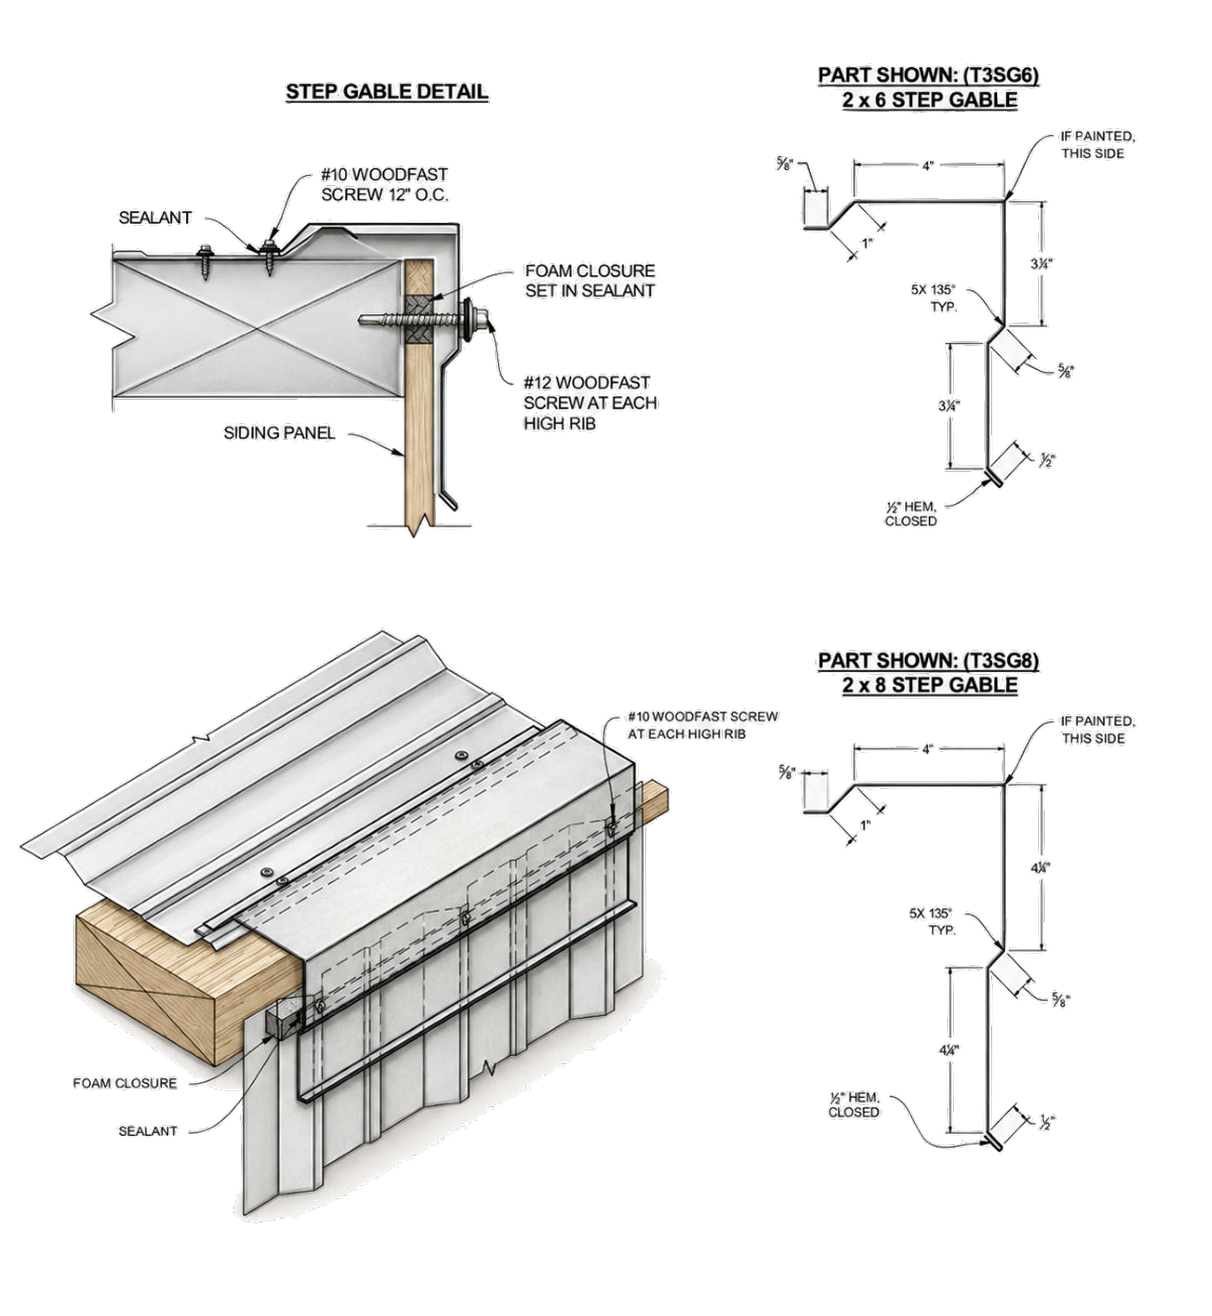
GABLE STEP DIAGRAMS

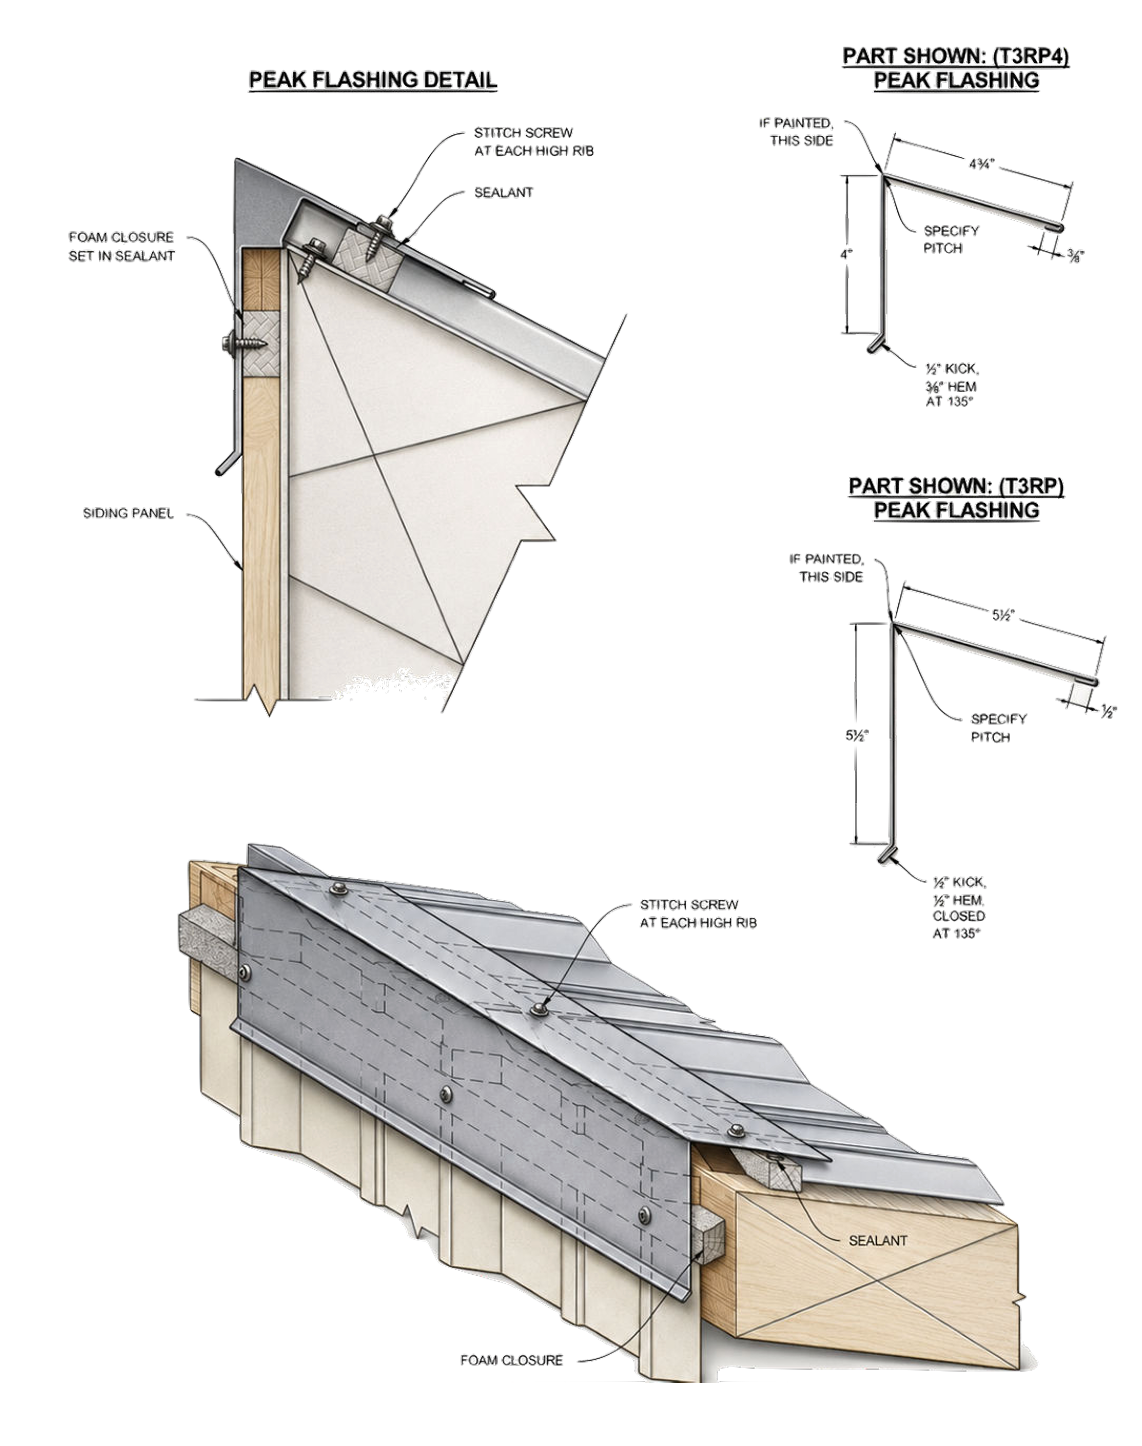
PEAK FLASHING FOR CORRUGATED PANELS

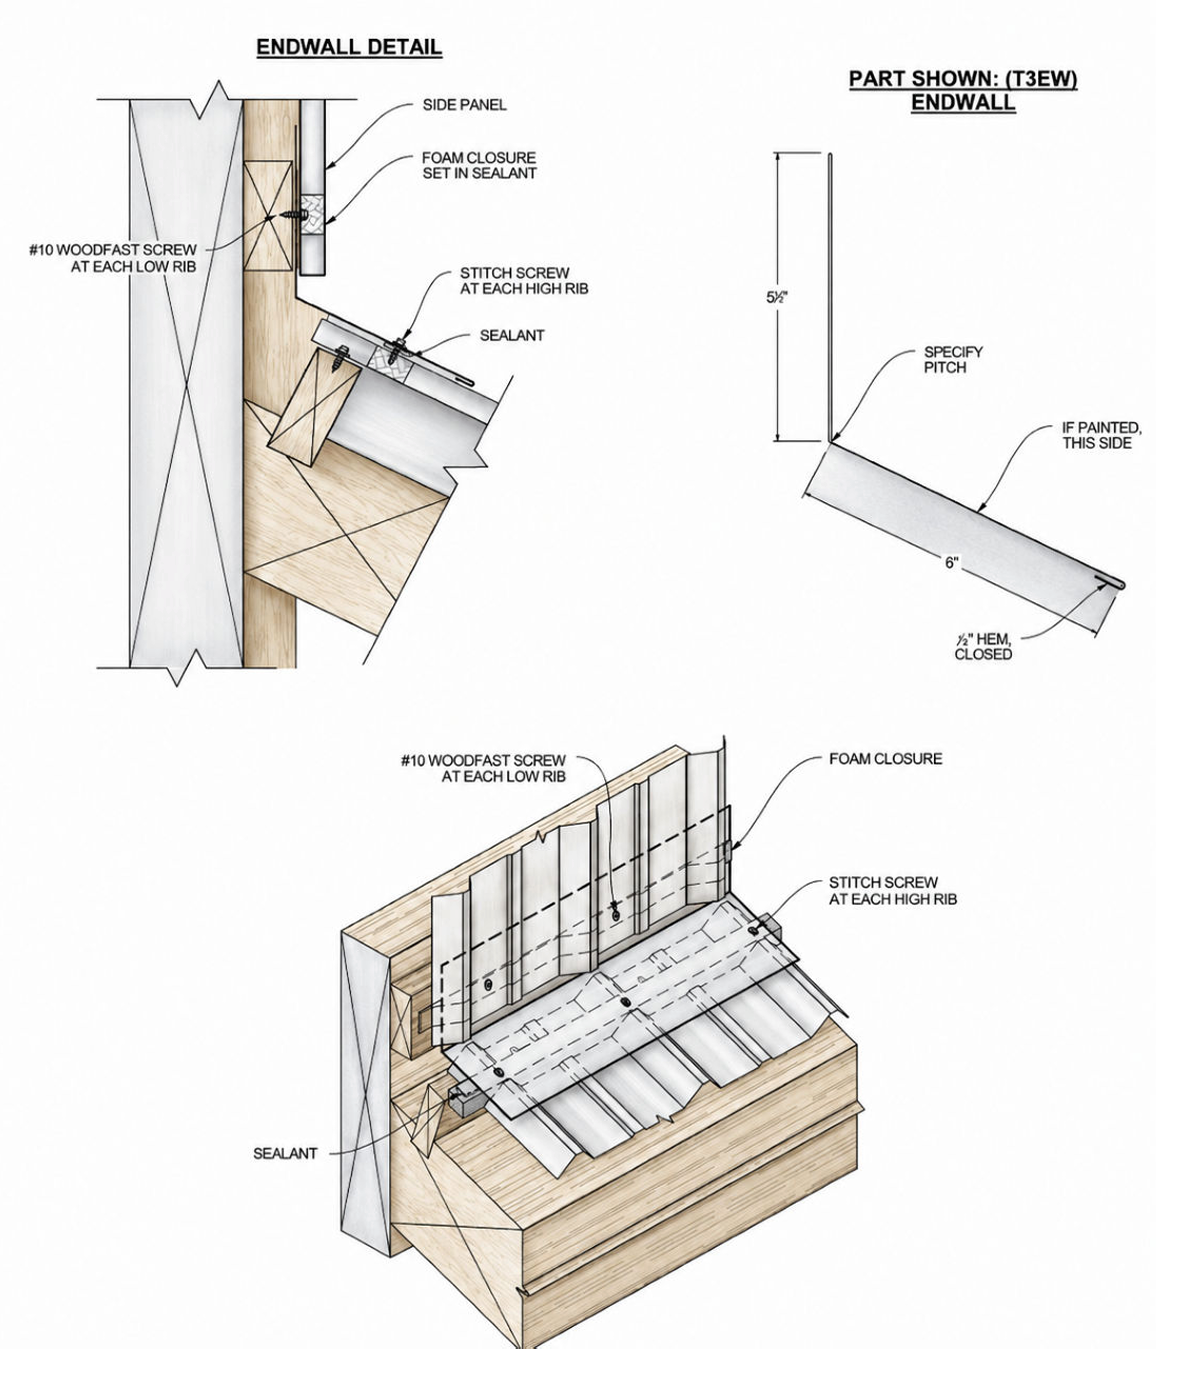
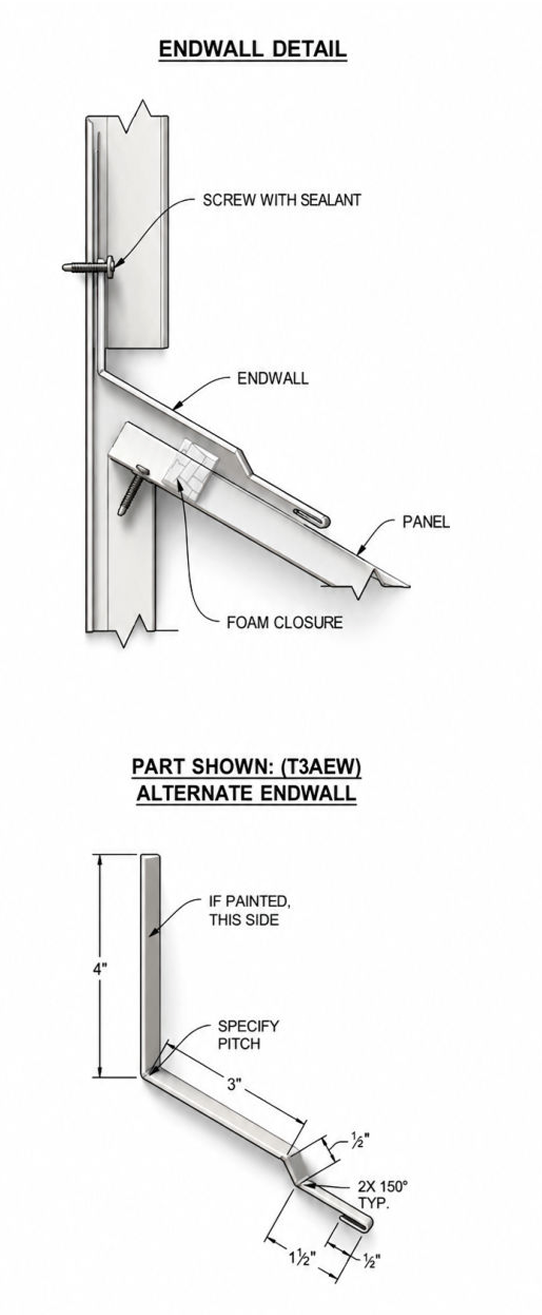
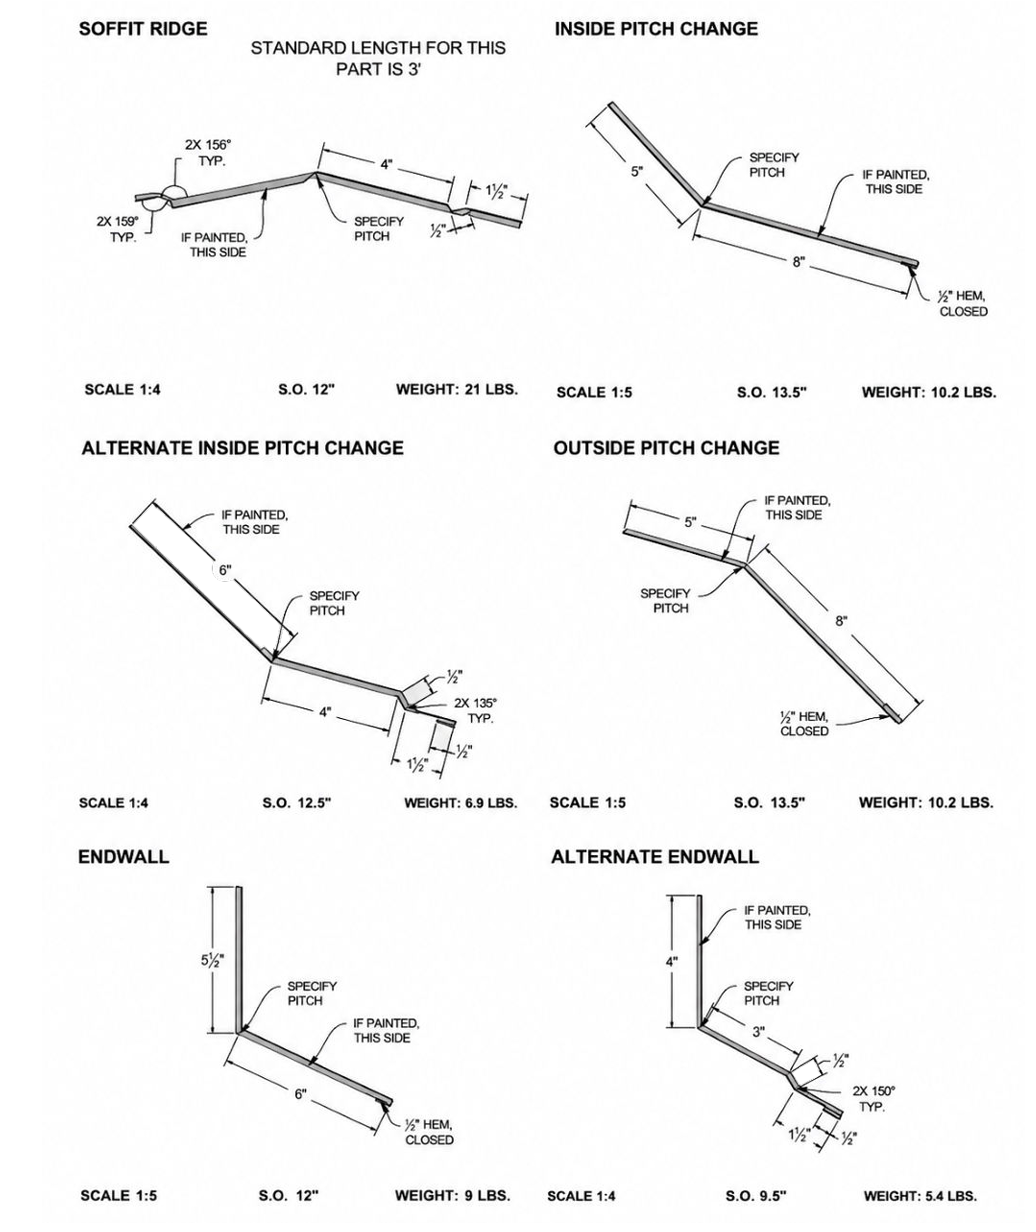
ENDWALL DIAGRAMS FOR CORRUGATED PANELS

ALTERNATE ENDWALL DIAGRAM FOR CORRUGATED PANELS

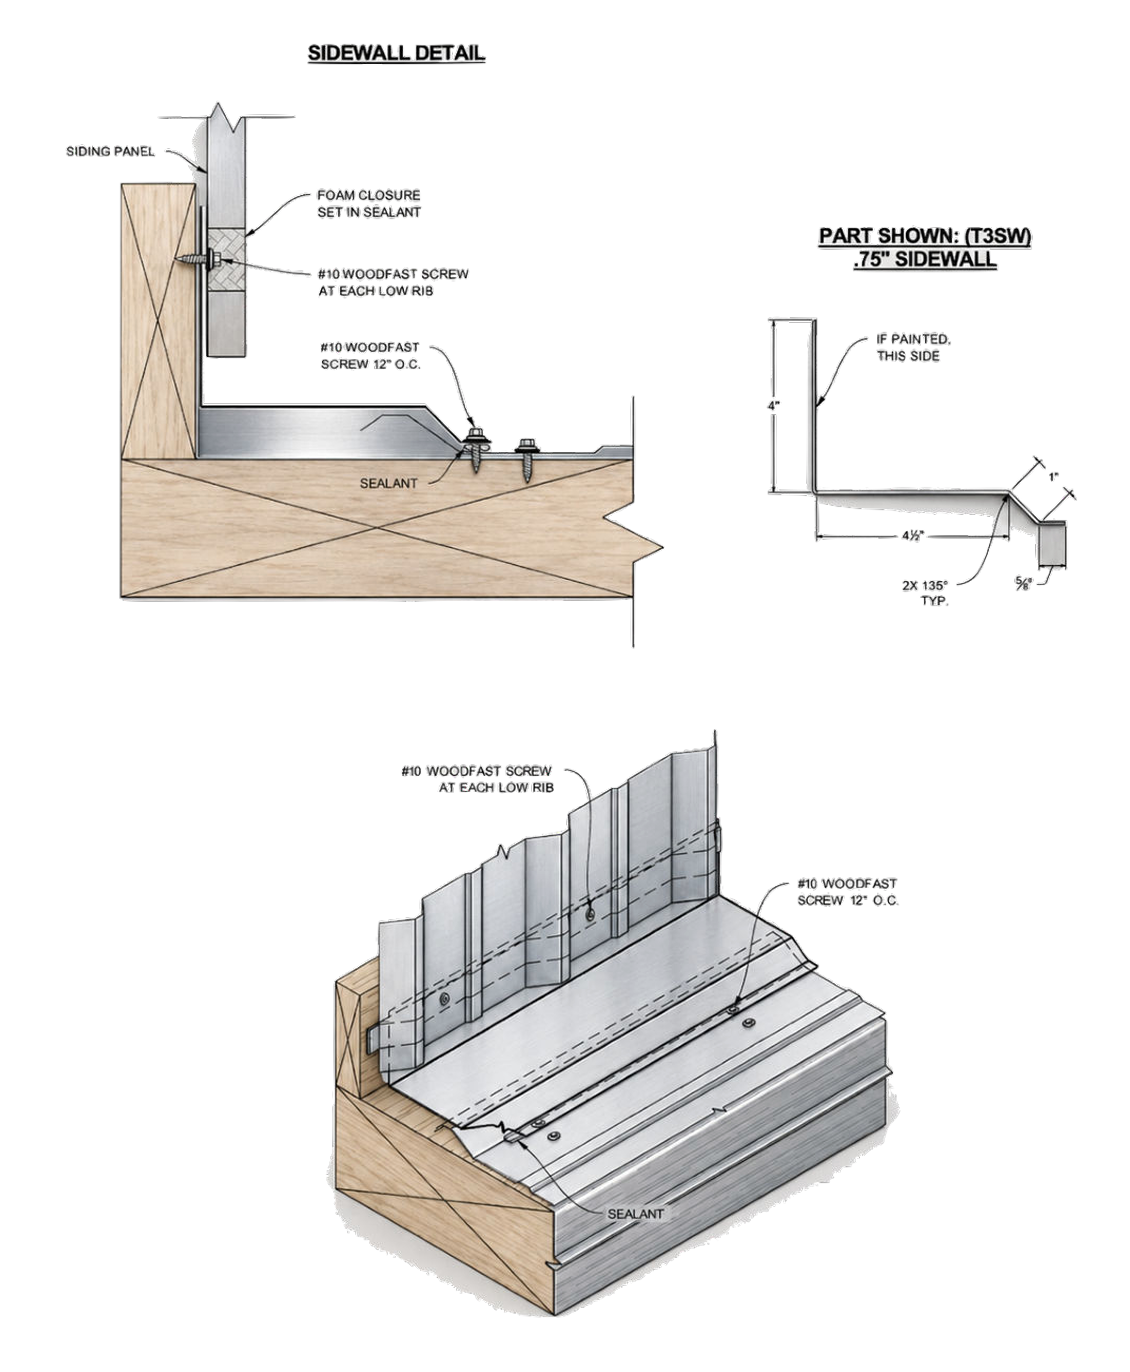
SIDE WALL DIAGRAMS FOR CORRUGATED PANELS

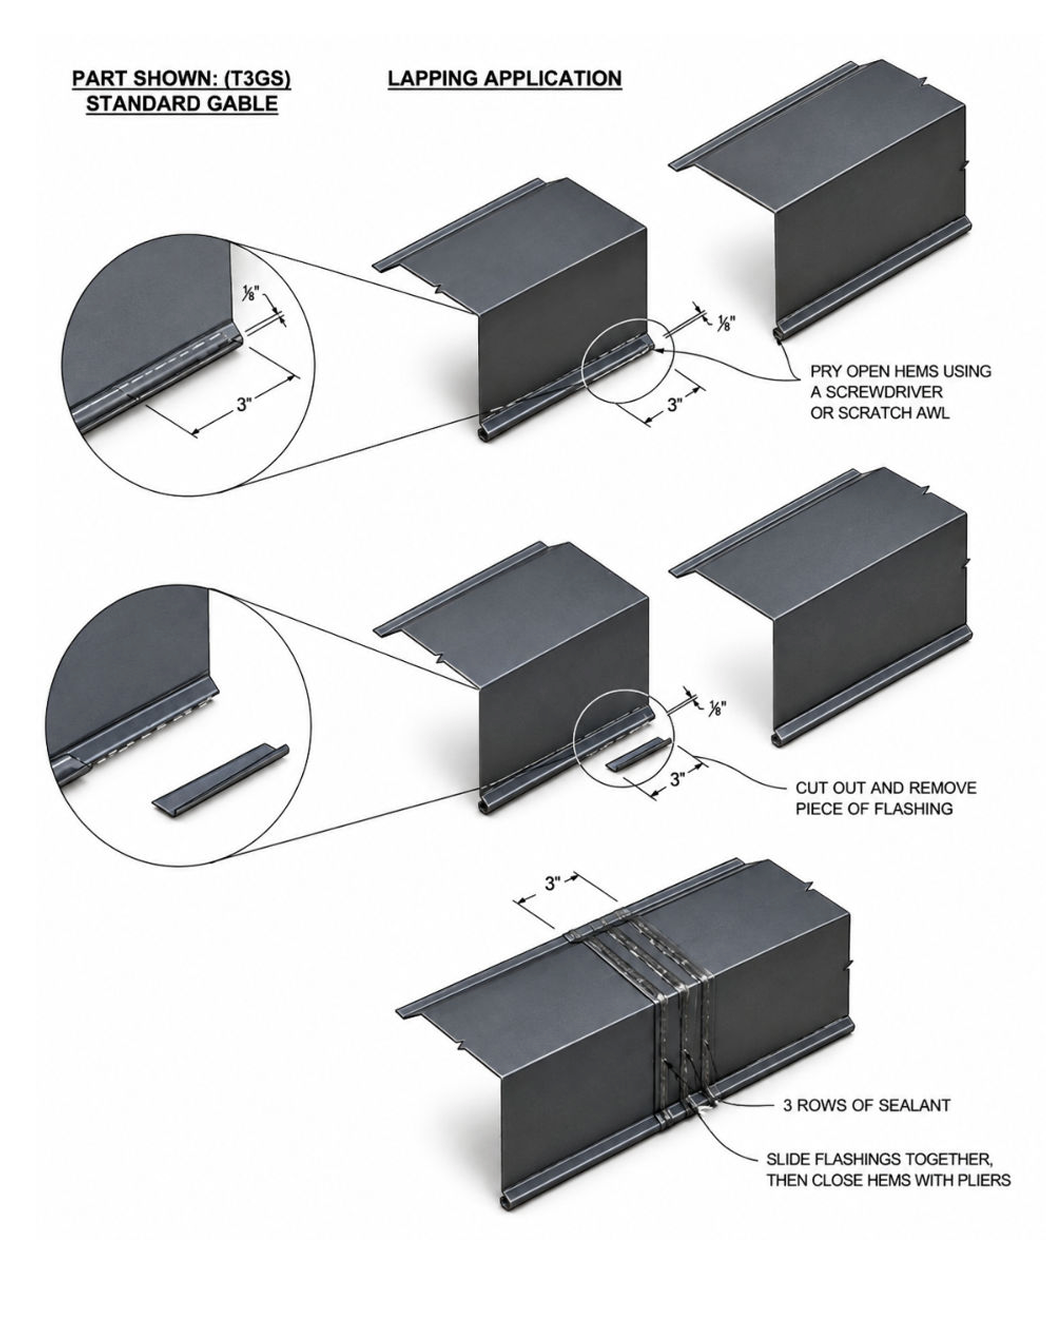
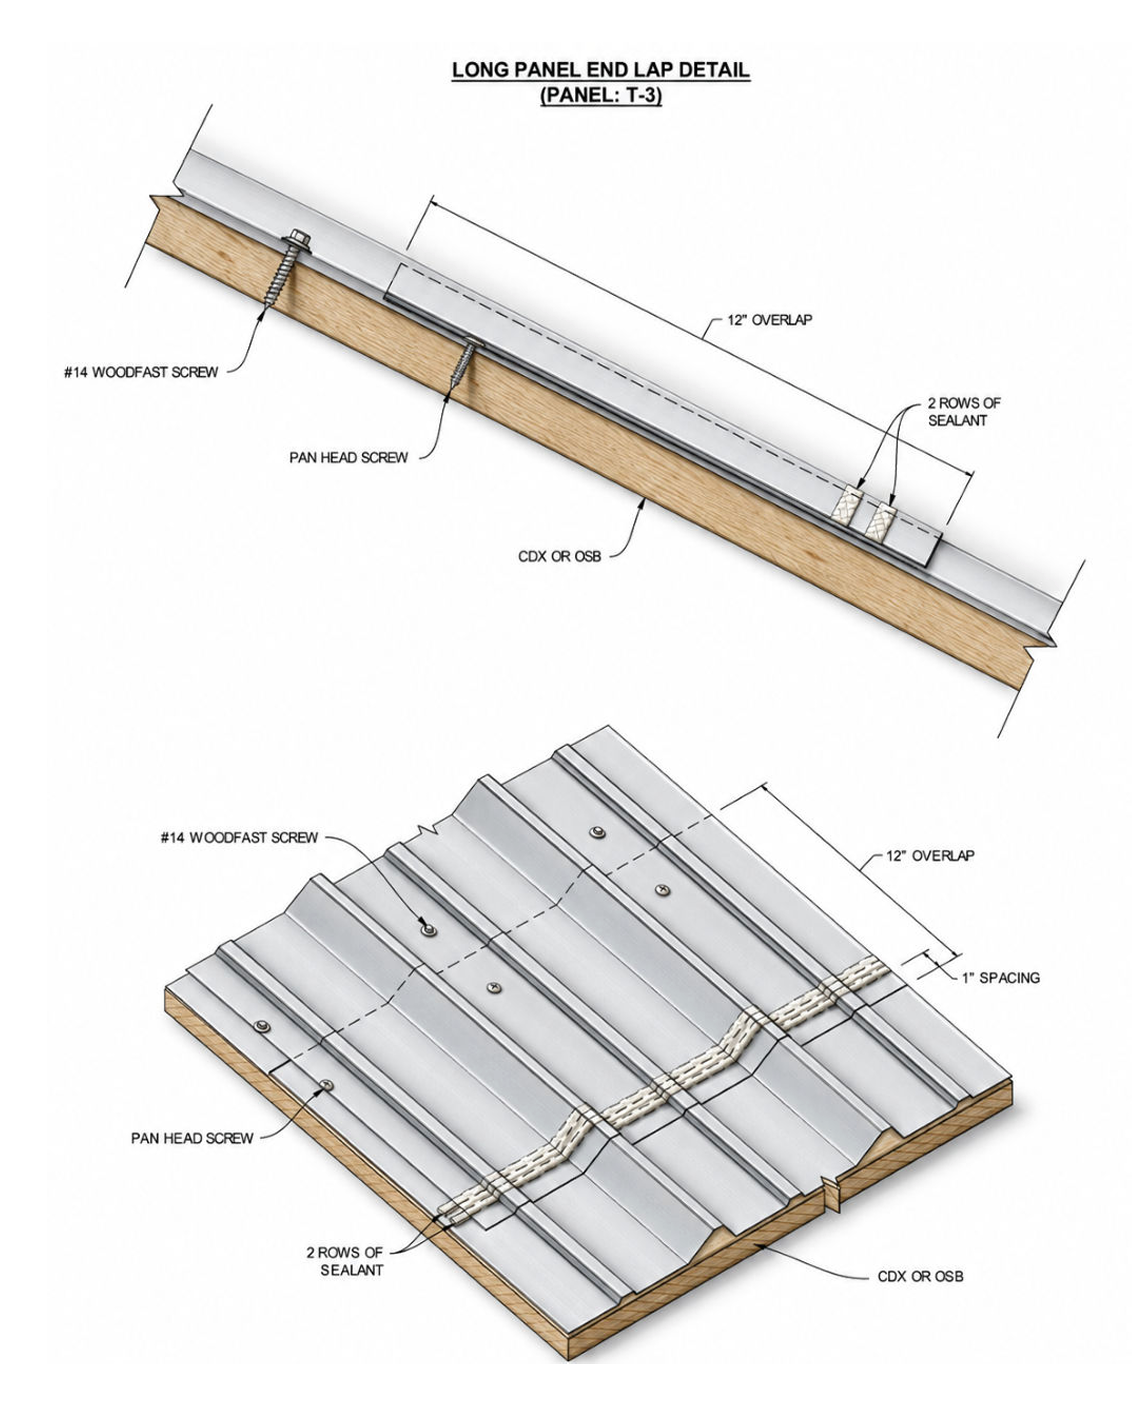
LAPPING APPLICATION DIAGRAMS

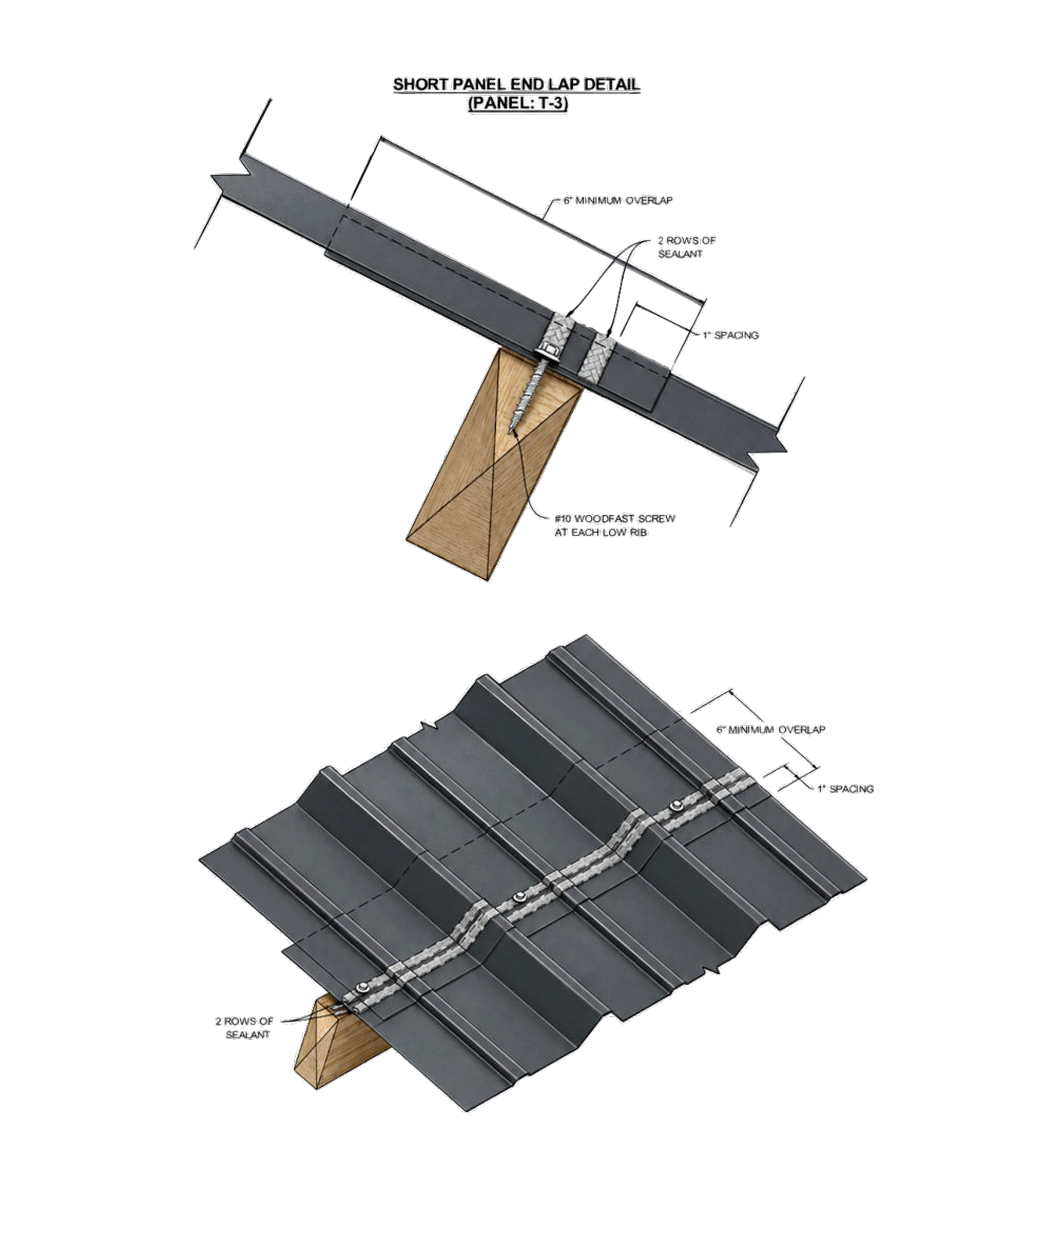
SHORT LAP APPLICATION

LONG LAP APPLICATION

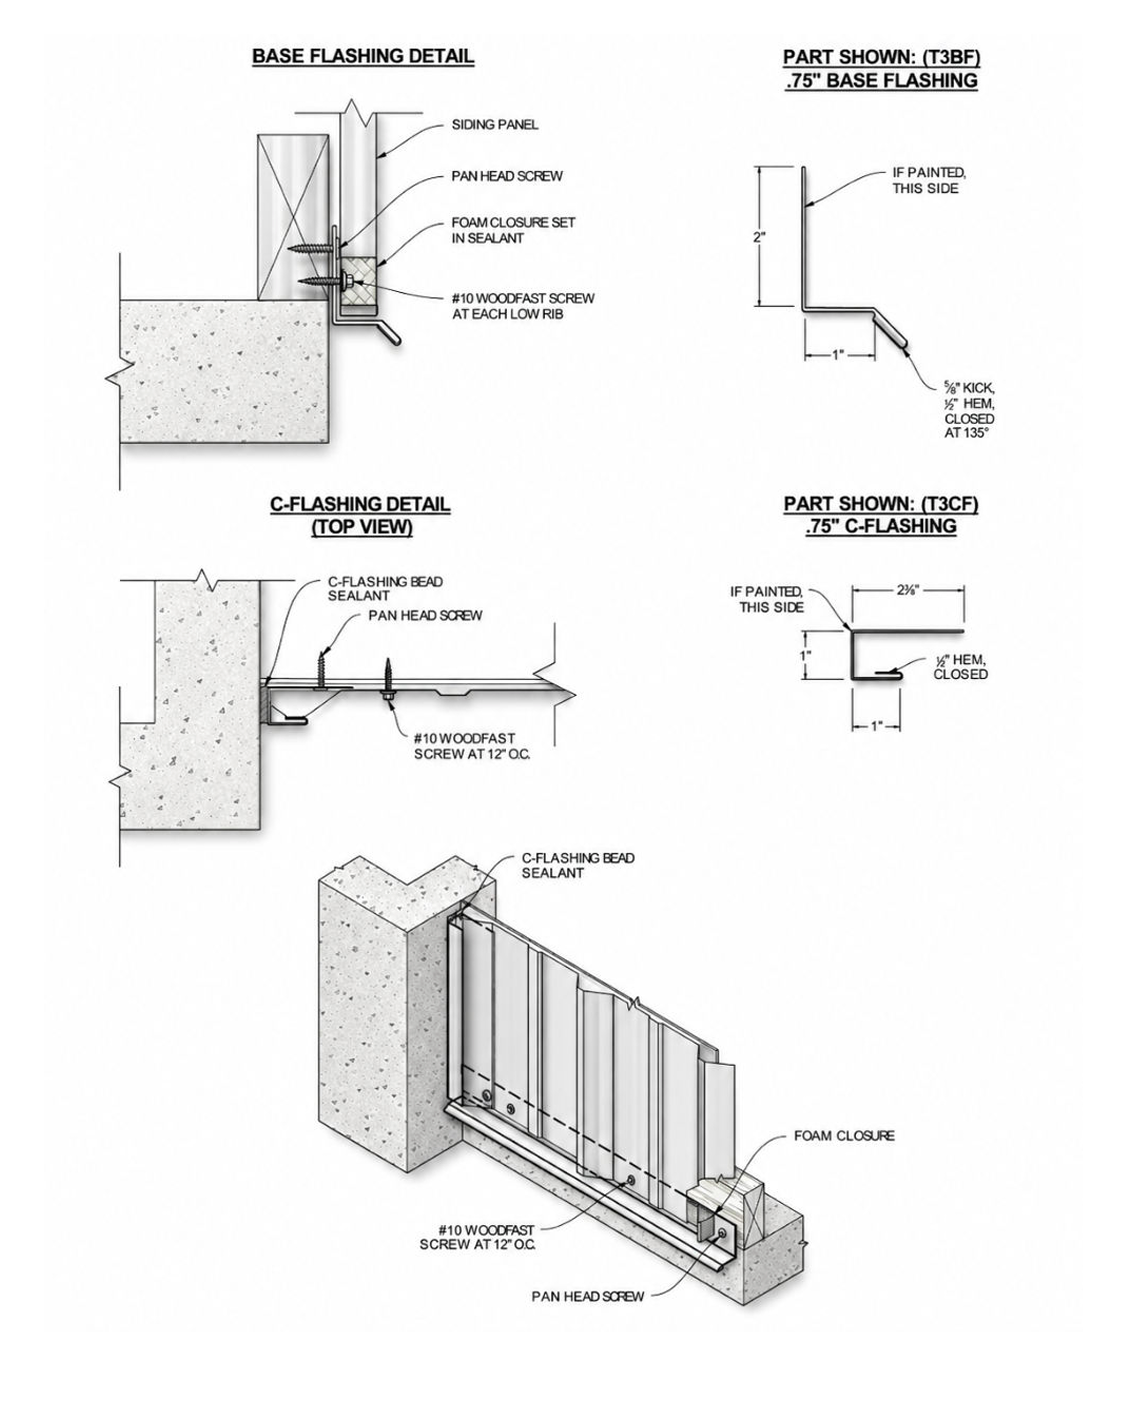
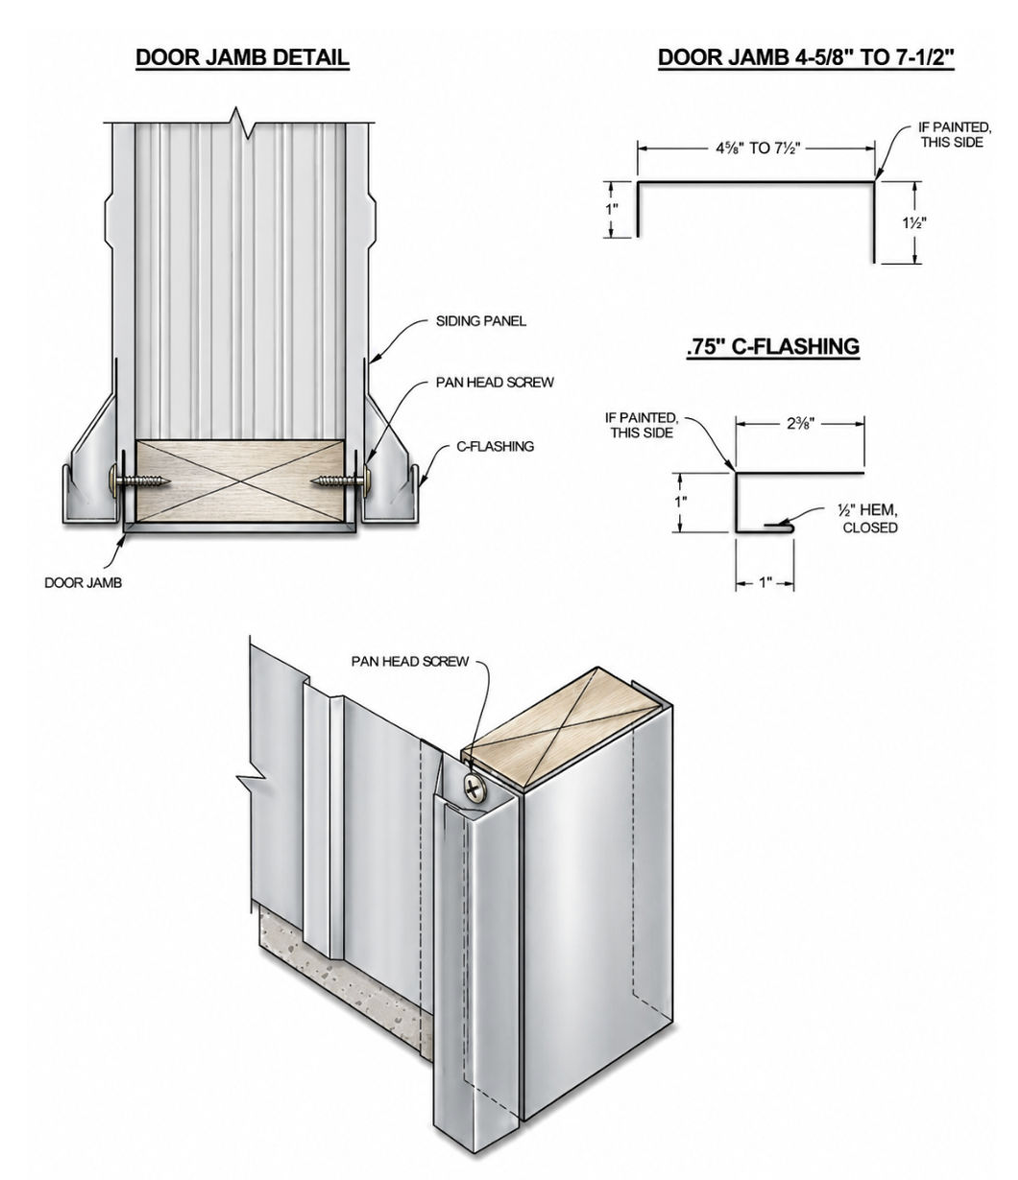
WALL BASE & C-FLASHING FOR CORRUGATED PANELS

Please complete the form, and we'll contact you within 24 hours to help guide you through your next project.
Get a Metal Roofing Consult
Contact us
Coordinated
We work with the homeowner first, or the contractor first, either way S3 provides the materials and cuts you need to install.
In-house
We never outsource anything! From materials to our fleet, packing, unpacking, cutting, and preparation.
As Promised
Our prices, delivery dates, and project times are carefully planned and executed to perfection.